Building real-time applications with AWS AppSync and Subscriptions
This article is part of a series about
AWS AppSync, in which I will explain what this service is and how you can use it in your architectures.1/2: Getting started: A Practical Approach to GraphQL
2/2: Building real-time applications
As I explained in the first AppSync article, real-time capabilities are becoming increasingly crucial. Users now expect immediate updates without the need for manual refreshing or constant polling. This is where AWS AppSync and its powerful GraphQL subscriptions come into play, enabling developers to build real-time applications effortlessly.
Using subscriptions with AWS AppSync, you will set up
real-time capabilitiesin your applications.
1. What are GraphQL subscriptions?
GraphQL subscriptions are a powerful feature that allows clients to receive real-time updates from the server. Unlike queries and mutations, which are one-time operations, subscriptions enable a continuous stream of data between the client and the server. This is particularly useful for applications that require real-time notifications or updates.
2. Key benefits of using AWS AppSync subscriptions
- Real-time Updates: Subscriptions push data to clients as soon as changes occur, ensuring users always have the latest information.
- Efficiency: Reduces the need for constant polling, saving bandwidth and improving performance.
- Seamless Integration: Easily integrates with other AWS services, such as DynamoDB, Lambda, and more.
3. Demo: Setting up real-time subscriptions with AWS AppSync
Let’s dive into the practical aspects of setting up real-time subscriptions in AWS AppSync.
Here you will find the GitHub code with the example of the real-time application: https://github.com/alazaroc/appsync-website-subscription
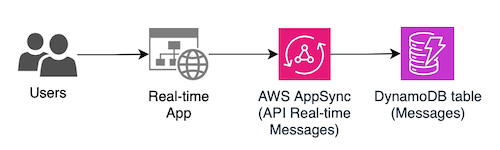
This is the architecture of the solution we will build:
3.1. Create the DynamoDB Table
We’ll use a DynamoDB table to store message data. Here’s the table schema we will create:
1
2
3
4
type Messages {
  id: String!
  message: String
}
To create it, you can use the Terraform code provided in this GitHub repository to create your DynamoDB table: https://github.com/alazaroc/appsync-website-subscription/tree/main/infrastructure.
If you are new with Terraform, you can check this other article
We will execute these commands inside the infrastructure folder (where the .tf files are located):
1
2
3
4
5
6
# We will init the configuration of terraform
terraform init
# We will check what will be created
terraform plan
# We will deploy it
terraform apply --auto-approve
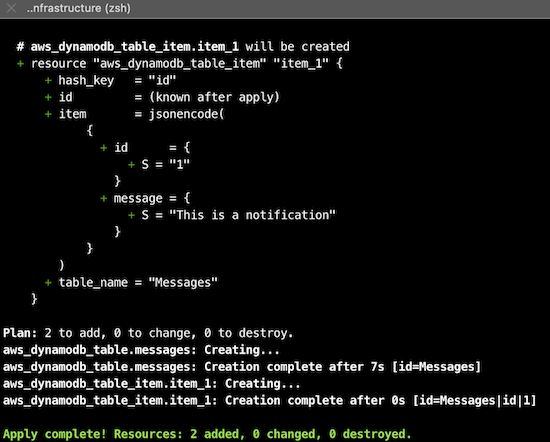
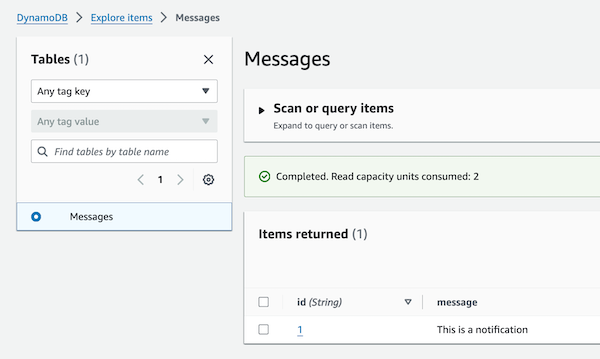
With this execution, we also have created one first element in the “Messages” table. We will enter the AWS Console to check it:
3.2. Create and configure the AWS AppSync API
3.2.1. Creating subscriptions
We will create a new AppSync API that will be connected with the DynamoDB table. In this case, we will not do it with Terraform, because we are here to learn how AppSync works for the real-time configuration. We will do it manually.
It is very straightforward:
- Access to the AWS AppSync service
- Create API
- In
GraphQL API Data SourceselectStart with a DynamoDB table - Choose an API name, and in the
Import from DynamoDB table, select the DynamoDB table name created previously:Messages. - Finally, in the
Configure model information, add one new fieldmessageofStringtype. Optionally, you can change the type of theidfield toIDinstead ofString.- If you configure the type as ID, when you create a value using the editor, the
IDtype will ensure that the value is unique and is treated as an identifier. This means comparisons will be based on the unique identifier rather than a simple string value, providing a more efficient and reliable way to reference items in your database.
- If you configure the type as ID, when you create a value using the editor, the
- That’s all
Now, you can explore the created API.
Let’s review the Schema, and specifically the subscription configuration:
This was created automatically:
1
2
3
4
5
6
7
8
type Subscription {
  onCreateMessages(id: ID, message: String): Messages
    @aws_subscribe(mutations: ["createMessages"])
  onUpdateMessages(id: ID, message: String): Messages
    @aws_subscribe(mutations: ["updateMessages"])
  onDeleteMessages(id: ID, message: String): Messages
    @aws_subscribe(mutations: ["deleteMessages"])
}
Here, it was created 3 subscriptions, one for each mutation operation: create, update, and delete. It means you can subscribe to one of these operations and then you will receive notifications when they would be executed.
I want to repeat it because this is how it works.
By subscribing to a mutation operation, you will receive a notification each time that operation is executed. This subscription establishes a WebSocket connection that is triggered specifically by the mutation operation, not directly by the database itself. Therefore, if you modify the database outside of the AWS AppSync service, you will not receive any notification.
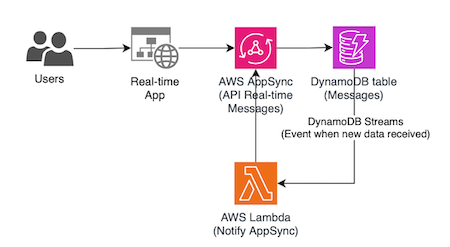
3.2.2. Get notified if the database is modified
To be notified if the change is done directly in the database without the use of the mutation operation of the AWS AppSync, you will have to use an additional configuration. In the case you were using DynamoDB, you will have to enable DynamoDB Streams and you will have to configure a Lambda function to notify your AWS AppSync. You can see it in the following diagram:
3.2.3. Alternative subscription: pub/sub channel
You can also create directly a real-time API, creating a simple pub/sub API powered by serverless WebSockets
If you use the AWS console to create a real-time WebSocket API where clients subscribe to channels, the full content of the schema will be as follows:
1
2
3
4
5
6
7
8
9
10
11
12
13
14
15
16
17
type Channel {
  name: String!
  data: AWSJSON!
}

type Mutation {
  publish(name: String!, data: AWSJSON!): Channel
}

type Query {
  getChannel: Channel
}

type Subscription {
  subscribe(name: String!): Channel
    @aws_subscribe(mutations: ["publish"])
}
And then you can use the mutation operation of publish to publish the data, and the subscription of subscribe to receive it in real-time. That’s all.
3.3. Implement real-time application
We will continue with our example of real-time application of messages stored in the DynamoDB table of Messages we had created before.
We will use this HTML and JavaScript code to implement real-time data updates in your application and at the same time, persist them in the database. This example uses the subscription to listen for new message entries.
Let’s explain how to use the connection with the subscription operation.
- We have to obtain the full URL of the WebSocket
- We have to use the new real-time endpoint: wss://${APPSYNC_ENDPOINT_ID}.appsync-realtime-api.${AWS_REGION}.amazonaws.com/graphql
- In the request, we have to include as parameter data in the header the following information
?header=${header}&payload=${payload}, so the full URL will be something likewss://${APPSYNC_ENDPOINT_ID}.appsync-realtime-api.${AWS_REGION}.amazonaws.com/graphql?header=${header}&payload=${payload} - The header must contain the encoded version of the headers
hostandx-api-key, as follows:
1
2
3
4
5
6
7
  function encodeAppSyncCredentials() {
    const creds = {
      host: `${APPSYNC_ENDPOINT_ID}.appsync-api.${AWS_REGION}.amazonaws.com`,
      "x-api-key": APPSYNC_API_KEY,
    };
    return window.btoa(JSON.stringify(creds));
  }
- The payload must be empty, so we can use the following:
1
 payload = window.btoa(JSON.stringify({}))
We will create the WebSocket connection using the URL from the previous step and initialize it:
1
2
3
4
5
6
7
8
 const websocket = new WebSocket(url, ["graphql-ws"]);
 websocket.addEventListener("open", () => {
   websocket.send(
     JSON.stringify({
       type: "connection_init",
     })
   );
 });
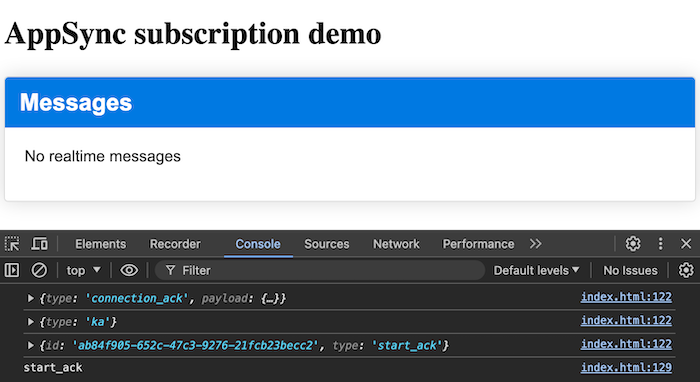
After that, handle the WebSocket messages based on their type:
connection_ack: Indicates that the WebSocket connection is successfully established.start_ack: Acknowledges that the subscription request has been received and accepted.error: Indicates that an error occurred during the process.data: Contains the real-time updates from the server based on the subscription.
1
2
3
4
5
6
7
8
9
10
11
12
13
14
15
16
17
18
 websocket.addEventListener("message", (event) => {
   const message = JSON.parse(event.data);
   console.log(message);
   switch (message.type) {
     case "connection_ack":
       startSubscription(websocket);
       break;
     case "start_ack":
       console.log("start_ack");
       break;
     case "error":
       console.error(message);
       break;
     case "data":
       handleNotification(message.payload.data.onCreateMessages);
       break;
   }
 });
- To create the connection for the first time, we will send a subscription request once the connection is acknowledged:
1
2
3
4
5
6
7
8
9
10
11
12
13
14
15
16
17
18
19
20
21
22
23
  function startSubscription(websocket) {
    const subscribeMessage = {
      id: window.crypto.randomUUID(),
      type: "start",
      payload: {
        data: JSON.stringify({
          query: `subscription onCreateMessages {
                    onCreateMessages {
                      id
                      message
                    }
                }`,
        }),
        extensions: {
          authorization: {
            "x-api-key": APPSYNC_API_KEY,
            host: `${APPSYNC_ENDPOINT_ID}.appsync-api.${AWS_REGION}.amazonaws.com`,
          },
        },
      },
    };
    websocket.send(JSON.stringify(subscribeMessage));
  }
Running the application. You only have to do two things:
Update your credentials in the code
1
2
3
  const AWS_REGION = "your-region"
  const APPSYNC_ID = "your-id-included-in-the-host";
  const APPSYNC_API_KEY = "your-api-key";
- This is an HTML static website. Just open the html file in your browser
3.4. Testing the application
To test the real-time application we have to create a message using the mutation operation of createMessages.
The easiest way to do it is using the Queries section in the AWS console. In the following messages, you will see how it works. On the left side of the image, you will see the AWS console and the message generation, and on the right side you will see our HTML application and the messages appearing after the creation:
Step 1, preparing the operation 
Step 2, running the operation and creating the message will update immediately the message in our real-time application: 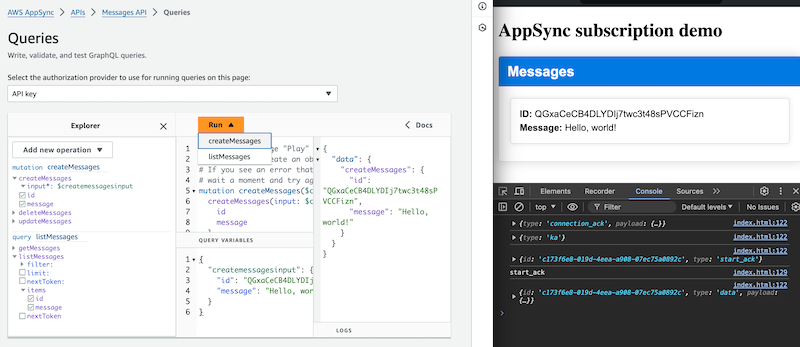
4. Conclusion
With AWS AppSync and subscriptions, building real-time applications becomes a straightforward process. By following this guide, you’ve set up a messaging system that notifies users in real-time whenever new messages are submitted. This approach can be extended to various use cases, making your applications more interactive and responsive.
Feel free to experiment and build more features into your application.
As Werner Vogels said:
There's never been a better time to be a builder.
NOW GO BUILD!