Automating AWS Resource Deployment with GitHub Actions and Terraform
Updated September 2025. This article is an updated version of my previous guide, now including the recommended OIDC approach to replace long-lived AWS access keys.
1. Introduction
In previous articles, we have discussed Terraform and explored various DevOps strategies for automating deployments on AWS.
- How to deploy a serverless website with Terraform
- How to Add CI/CD to my CDK Project
- How to Add CI/CD to my SAM Project
Now, we’ll automate the deployment of Terraform projects using GitHub Actions. Regardless of what you need to deploy, this approach enables efficient, automated Terraform-based infrastructure deployments.
Before diving into details, I want to mention that I’ll explain two approaches to set up authentication with AWS: using OIDC or using secrets.
And I’ve created a repository for each approach:
- Deploying Terraform from GitHub using OIDC: https://github.com/alazaroc/terraform-aws-cicd-github-actions-with-oidc
- Deploying Terraform from GitHub using secrets: https://github.com/alazaroc/terraform-aws-cicd-github-actions-with-secrets
Feel free to customize the examples. You can use them to deploy any AWS resource.
1.1. What is GitHub Actions?
GitHub Actions is an automation tool within GitHub that allows you to create workflows triggered by GitHub events, such as pushes or pull requests. It’s commonly used for CI/CD pipelines to automate tasks like testing, building, and deploying applications.
1.2. How GitHub Actions works with Terraform
When using GitHub Actions to deploy Terraform resources, the typical workflow involves:
- Triggering workflows based on changes in the repository.
- Setting up AWS credentials using GitHub Secrets (or, preferably, using OIDC for better security).
- Running Terraform commands (e.g.,
terraform plan,terraform apply) to manage infrastructure.
1.3. Prerequisites
Before getting started, make sure you have:
- AWS Account with permissions to create the resources (S3, DynamoDB, Budgets).
- GitHub Repository: A GitHub repository to store your Terraform configuration.
- Deploying Terraform from GitHub using OIDC: https://github.com/alazaroc/terraform-aws-cicd-github-actions-with-oidc
- Deploying Terraform from GitHub using secrets: https://github.com/alazaroc/terraform-aws-cicd-github-actions-with-secrets
- Configure remote backend for Terraform State (Optional): You can use an S3 bucket and DynamoDB table to manage state locking.
- Terraform Installed Locally: recommended for testing locally before committing.
Authentication with AWS will be configured later.
There are two approaches to configure authentication with AWS:
- OIDC (recommended) – secure and modern. You will use an IAM Role.
- Legacy – static access keys in GitHub Secrets. You will use AWS Access Keys on IAM.
2. Step 1: Prepare the Terraform Code
Create your Terraform code. In this example, we will deploy a simple AWS Budget resource, but you can deploy anything using Terraform.
First, create a main.tf file with the following code:
1
2
3
4
5
6
7
8
9
10
11
12
13
14
15
16
17
18
19
20
21
22
23
24
25
26
27
28
29
provider "aws" {
  region = "eu-west-1"
}

# Customize with your own S3 bucket and DynamoDB table if you want to use a Remote Backend for State
terraform {
  backend "s3" {
    bucket         = "terraform-tfstate-playingaws-poc"     # Update it
    key            = "poc/terraform-github-actions.tfstate" # Update it
    region         = "eu-west-1"                            # Update it
    dynamodb_table = "terraform-lock"                       # Update it
    encrypt        = true
  }
}

resource "aws_budgets_budget" "zero_spend_budget" {
  name         = "ZeroSpendBudget"
  budget_type  = "COST"
  limit_amount = "0.1"
  limit_unit   = "USD"
  time_unit    = "MONTHLY"
  notification {
    comparison_operator        = "GREATER_THAN"
    threshold                  = 0
    threshold_type             = "ABSOLUTE_VALUE"
    notification_type          = "ACTUAL"
    subscriber_email_addresses = ["your_email@domain.com"]
  }
}
If you don’t include the backend configuration, by default, Terraform state is stored locally in the GitHub runner. This means that in subsequent executions, you could encounter state inconsistencies, so it’s recommended to use a remote backend.
If you include the backend configuration but you have not created the S3 bucket and the DynamoDB table in the first place, you will receive an error in the pipeline execution.
3. Step 2: Configuring AWS Credentials in GitHub
To allow GitHub Actions to deploy resources in your AWS account, you must provide AWS credentials to the runner. There are two ways to do this:
OIDC (recommended): short-lived credentials issued at runtime via OpenID Connect, with a restrictive trust policy bound to your repo/branch (no static secrets).- Legacy (less secure): long-lived Access Keys stored as GitHub Secrets.
Below you will find both approaches. We will start with OIDC and then show the legacy method for completeness and migration scenarios.
3.1 Using OIDC (Recommended)
While using AWS Access Keys stored in GitHub Secrets works, it’s no longer the best practice. A more secure approach is to use GitHub OpenID Connect (OIDC) to obtain temporary credentials directly from AWS, without long-lived secrets.
Why OIDC is better
- No static secrets stored in GitHub → reduces the risk of leaks.
- Ephemeral credentials → valid only for a short time.
- Granular trust policy → restrict access to specific repos/branches.
How it works
- Configure GitHub as an OIDC provider in your AWS account.
- Create an IAM Role with a trust policy restricted to your GitHub repository and branch.
- Attach the least-privilege policy needed for Terraform (S3, DynamoDB, Budgets in this example).
- Update your workflow to use OIDC.
Trust policy example:
1
2
3
4
5
6
7
8
9
10
11
12
13
14
15
16
17
18
{
  "Version": "2012-10-17",
  "Statement": [
    {
      "Effect": "Allow",
      "Principal": { "Federated": "arn:aws:iam::<YOUR_ACCOUNT_ID>:oidc-provider/token.actions.githubusercontent.com" },
      "Action": "sts:AssumeRoleWithWebIdentity",
      "Condition": {
        "StringEquals": {
          "token.actions.githubusercontent.com:aud": "sts.amazonaws.com"
        },
        "StringLike": {
          "token.actions.githubusercontent.com:sub": "repo:<YOUR_ORG_OR_USER>/<YOUR_REPO>:ref:refs/heads/main"
        }
      }
    }
  ]
}
Workflow change (key section):
1
2
3
4
5
6
7
8
9
permissions:
  id-token: write
  contents: read

- name: Configure AWS credentials (OIDC)
  uses: aws-actions/configure-aws-credentials@v4
  with:
    role-to-assume: arn:aws:iam::<YOUR_ACCOUNT_ID>:role/<ROLE_FOR_GITHUB>
    aws-region: ${{ env.AWS_REGION }}
By using OIDC, GitHub Actions retrieves short-lived credentials on each run, making the setup more secure and more aligned with AWS best practices.
OIDC is now the industry standard for connecting GitHub Actions with AWS. By adopting it, you reduce the risk of compromised credentials and align with AWS security best practices.
3.2 Using GitHub Secrets (Legacy)
If you cannot use OIDC yet (for example, due to organizational restrictions), you can fall back to storing AWS Access Keys in GitHub Secrets.
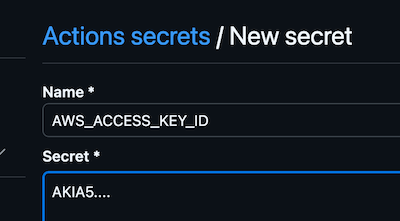
Add the following secrets in your GitHub repository:
- AWS_ACCESS_KEY_ID
- AWS_SECRET_ACCESS_KEY
How?
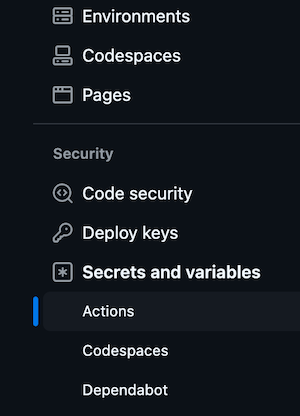
- Go to your repository’s settings.
- Navigate to Secrets and Variables > Actions.
- Add the following secrets:
AWS_ACCESS_KEY_ID: Your AWS Access Key ID.AWS_SECRET_ACCESS_KEY: Your AWS Secret Access Key.

This ensures that your AWS credentials are securely available to the GitHub Actions workflow.
Then configure the workflow like this:
1
2
3
4
5
6
7
- name: Configure AWS credentials
  uses: aws-actions/configure-aws-credentials@v4
  with:

    aws-access-key-id: ${{ secrets.AWS_ACCESS_KEY_ID }}
    aws-secret-access-key: ${{ secrets.AWS_SECRET_ACCESS_KEY }}
    aws-region: ${{ env.AWS_REGION }}
While your repository might be public,
your AWS credentials remain secureby being stored in the encrypted Secrets section.GitHub also has built-in
Secrets Detectionto prevent accidental exposure.
4. Step 3: Configure GitHub Actions for Terraform Deployment
Now that we have the Terraform code, let’s set up GitHub Actions to automate its deployment.
Create the workflow file in your GitHub repository at .github/workflows/terraform-deploy.yml.
4.1 Using OIDC (Recommended)
1
2
3
4
5
6
7
8
9
10
11
12
13
14
15
16
17
18
19
20
21
22
23
24
25
26
27
28
29
30
31
32
33
34
35
36
37
38
39
40
41
42
43
44
45
46
47
48
49
50
51
52
53
54
55
56
57
58
59
60
61
62
63
64
65
66
67
68
69
70
71
72
73
74
75
76
77
78
79
80
81
82
83
84
85
86
87
88
89
90
91
92
93
94
95
96
97
name: Terraform Deploy (OIDC)

on:
  push:
    branches:
      - main
    paths:
      - 'main.tf'
      - '.github/workflows/terraform-deploy.yml'
  pull_request:
    branches:
      - main
    paths:
      - 'main.tf'
      - '.github/workflows/terraform-deploy.yml'
  workflow_dispatch:

permissions:
  id-token: write   # required for OIDC
  contents: read    # required for checkout

env:
  AWS_REGION: ${{ env.AWS_REGION }}
  TF_IN_AUTOMATION: true

concurrency:
  group: terraform-${{ github.ref }}
  cancel-in-progress: false

jobs:
  plan:
    name: Terraform Plan
    runs-on: ubuntu-latest

    steps:
      - name: Checkout
        uses: actions/checkout@v4

      - name: Setup Terraform
        uses: hashicorp/setup-terraform@v3

      - name: Configure AWS credentials (OIDC)
        uses: aws-actions/configure-aws-credentials@v4
        with:
          role-to-assume: arn:aws:iam::<YOUR_ACCOUNT_ID>:role/<ROLE_FOR_GITHUB>
          aws-region: ${{ env.AWS_REGION }}

      - name: Terraform Init
        run: terraform init -input=false

      - name: Terraform Format Check
        run: terraform fmt -check

      - name: Terraform Validate
        run: terraform validate

      - name: Terraform Plan
        run: terraform plan -input=false -out=tfplan

      - name: Upload plan artifact
        uses: actions/upload-artifact@v4
        with:
          name: tfplan
          path: tfplan

  apply:
    name: Terraform Apply (requires approval)
    needs: plan
    runs-on: ubuntu-latest
    environment:
      name: production   # configure Environment protections (required reviewers) in GitHub -> Settings -> Environments
    if: github.event_name != 'pull_request'  # don't apply on PRs

    steps:
      - name: Checkout
        uses: actions/checkout@v4

      - name: Setup Terraform
        uses: hashicorp/setup-terraform@v3

      - name: Configure AWS credentials (OIDC)
        uses: aws-actions/configure-aws-credentials@v4
        with:
          role-to-assume: arn:aws:iam::<YOUR_ACCOUNT_ID>:role/<ROLE_FOR_GITHUB>
          aws-region: ${{ env.AWS_REGION }}

      - name: Terraform Init
        run: terraform init -input=false

      - name: Download plan artifact
        uses: actions/download-artifact@v4
        with:
          name: tfplan
          path: .

      - name: Terraform Apply
        run: terraform apply -input=false tfplan
In the
applyjob we specifyenvironment: production.This allows you to configure Environment Protection Rules in GitHub (Settings → Environments → production), so that
terraform applyrequires manual approval before execution.If you don’t need this behavior, you can safely remove the
environment:line.Or you can also define multiple environments (e.g.,
staging,production) and require different reviewers per environment.
4.2 Using GitHub Secrets (Legacy)
1
2
3
4
5
6
7
8
9
10
11
12
13
14
15
16
17
18
19
20
21
22
23
24
25
26
27
28
29
30
31
32
33
34
35
36
37
38
39
40
41
42
43
44
45
name: Deploy Terraform

on:
  push:
    branches:
      - main

jobs:
  terraform:
    name: Deploy Terraform Job
    runs-on: ubuntu-latest

    steps:
      # Pulls the latest version of your code from the GitHub repository
      - name: Checkout code
        uses: actions/checkout@v4

      # Installs Terraform on the GitHub runner
      - name: Set up Terraform
        uses: hashicorp/setup-terraform@v3

      # Configures your AWS access by using the credentials stored in GitHub Secrets
      - name: Configure AWS credentials
        uses: aws-actions/configure-aws-credentials@v4
        with:

          aws-access-key-id: ${{ secrets.AWS_ACCESS_KEY_ID }}
          aws-secret-access-key: ${{ secrets.AWS_SECRET_ACCESS_KEY }}
          aws-region: ${{ env.AWS_REGION }}

      # Initialize terraform
      - name: Initialize Terraform
        run: terraform init

      # Execute the terraform plan
      - name: Terraform Plan
        run: terraform plan

      # Deploy terraform changes
      - name: Terraform Apply
        run: terraform apply -auto-approve

      # Destroy terraform resources (uncomment lines below)
      # - name: Terraform Destroy
      #   run: terraform destroy -auto-approve
5. Step 4: Testing the Setup
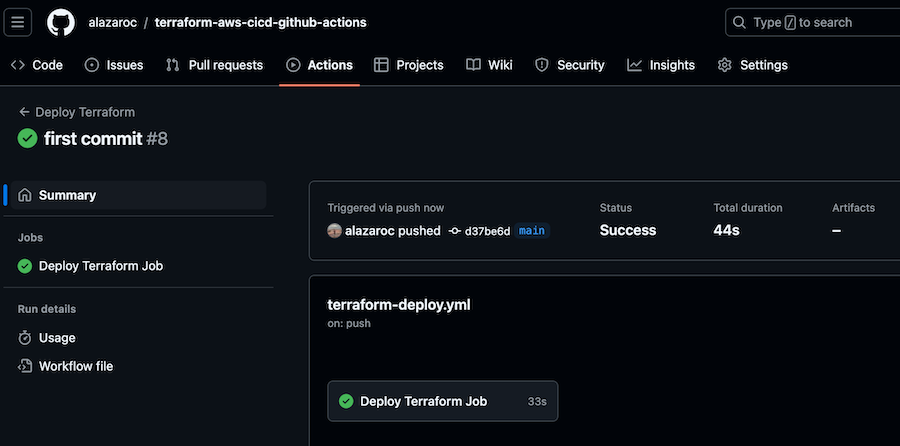
Push your Terraform code and GitHub Actions configuration to the main branch.
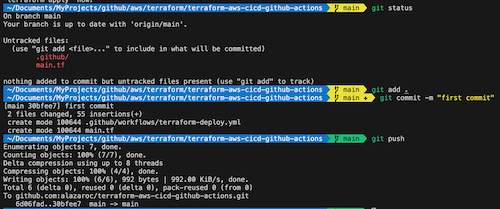
GitHub Actions will trigger automatically, and you can monitor the deployment under the Actions tab of your repository.
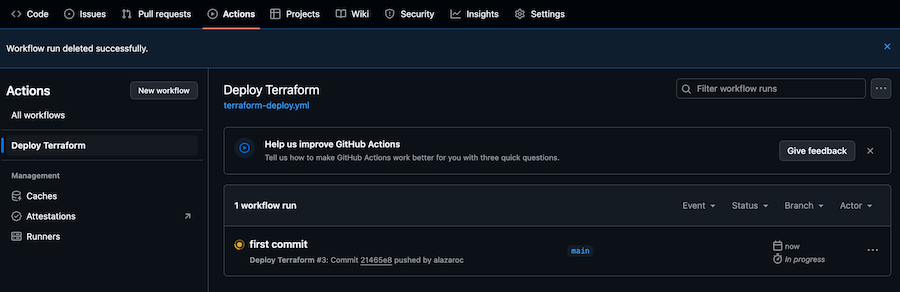
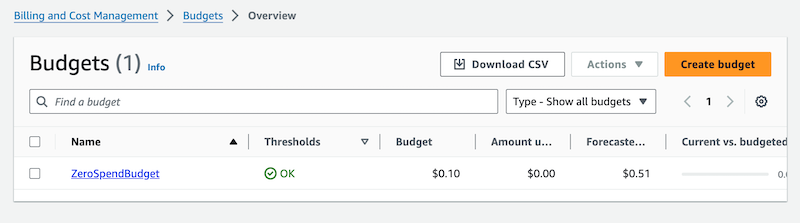
If the deployment succeeds, your AWS Budget (or whatever Terraform resource you define) will be applied automatically.
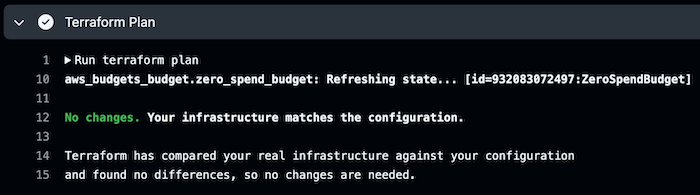
Now, each time you push changes to the repository, the pipeline will be triggered, and if you haven’t made any changes, the pipeline will finish with this message:
6. Conclusion
By using GitHub Actions to deploy Terraform resources, you can fully automate your infrastructure management processes. The combination of Terraform and GitHub Actions creates a powerful CI/CD pipeline, allowing you to deploy infrastructure changes automatically.
Although we used an AWS Budget resource in this example, you can apply the same process to any other AWS resource supported by Terraform.
While this article shows both methods, the recommended approach is using OIDC to avoid static credentials and improve security.
7. Next steps
- Manual Approval for terraform apply: Add a manual approval step to review the terraform plan output
- Include Security Tools: Integrate tools like tflint and checkov to lint and check for security issues
- Automate Testing: Use unit testing frameworks like terratest to validate your Terraform code before deployment
- If you are still using AWS Access Keys stored in GitHub Secrets,
migrate to the OIDC approachas soon as possible to reduce risk and align with AWS security best practices.- I have already wrote an article about how to migrate from GitHub Secrets to OIDC