How to add CI/CD to my SAM project
TLDR
This is my second article about SAM. I have explained
how to create serverless applications using SAMhere, detailing all the essential information about SAM. It would be beneficial to review that article before proceeding with this one.
We will use sam pipeline to deploy the solution.
I had to create
one custom templateto be able to deploy the solutionusing only 1 stage. Using the default templates you have to use 2, and I don’t want to do it for this PoC. This is the GitHub code of my custom template
1. Introduction
We will add CI/CD to our SAM application through the pipeline integration of the AWS SAM CLI.
As we want to add automation to our deployment process and integrate it with the AWS ecosystem, we will use the AWS Developer tools (CodePipeline and CodeBuild). For the Git repository, I will use GitHub.
This is the SAM project code on GitHub that we will use in the article. In the commit history you can find the evolution of the application through the steps explained.
2. Add CI/CD to a SAM project
We will create the CI/CD pipeline to implement continuous deployment, so when we push new code, the pipeline deploys our resources automatically.
From AWS documentation: AWS SAM provides a set of
default pipeline templatesfor multiple CI/CD systems that encapsulate AWS’s deployment best practices. These default pipeline templates use standard JSON/YAML pipeline configuration formats, and the built-in best practices help perform multi-account and multi-region deployments and verify that pipelines cannot make unintended changes to infrastructure.
We want to create a new pipeline in the AWS CodePipeline resource using the SAM templates.
To generate the pipeline for AWS CodePipeline, we have to perform the following tasks in this order:
- Create infrastructure resources
- Generate the pipeline configuration
- Commit the pipeline configuration to the Git repository
- Deploy the pipeline
- Connect the Git repository with the CI/CD system
After you’ve generated the starter pipeline configuration and committed it to your Git repository, whenever someone commits a code change to that repository your pipeline will be triggered to deploy the new changes automatically.
2.1. Step 1: Create infrastructure resources (bootstrap)
The Pipelines that use AWS SAM require certain AWS resources, like an IAM user and roles with necessary permissions, an Amazon S3 bucket, and optionally an Amazon ECR repository. You must have a set of infrastructure resources for each deployment stage of the pipeline.
Then, for each stage we need (dev, test, prod…), we have to run sam pipeline bootstrap. This command will create a CloudFormation stack with the name aws-sam-cli-managed-${stage}-pipeline-resources which the necessary resources that SAM needs.
We will create a single stage with the name test:
1
sam pipeline bootstrap
Click to view command output
    sam pipeline bootstrap generates the required AWS infrastructure resources to connect
    to your CI/CD system. This step must be run for each deployment stage in your pipeline,
    prior to running the sam pipeline init command.

    We will ask for [1] stage definition, [2] account details, and
    [3] references to existing resources in order to bootstrap these pipeline resources.

    [1] Stage definition
    Enter a configuration name for this stage. This will be referenced later when you use the sam pipeline init command:
    Stage configuration name: > test

    [2] Account details
    The following AWS credential sources are available to use.
    To know more about configuration AWS credentials, visit the link below:
    https://docs.aws.amazon.com/cli/latest/userguide/cli-configure-files.html
        1 - Environment variables
        2 - default (named profile)
        3 - localstack (named profile)
        q - Quit and configure AWS credentials
    Select a credential source to associate with this stage: > 1
    Associated account 00000000000 with configuration test.

    Enter the region in which you want these resources to be created [eu-west-1]:
    Select a user permissions provider:
        1 - IAM (default)
        2 - OpenID Connect (OIDC)
    Choice (1, 2): 1
    Enter the pipeline IAM user ARN if you have previously created one, or we will create one for you []:

    [3] Reference application build resources
    Enter the pipeline execution role ARN if you have previously created one, or we will create one for you []:
    Enter the CloudFormation execution role ARN if you have previously created one, or we will create one for you []:
    Please enter the artifact bucket ARN for your Lambda function. If you do not have a bucket, we will create one for you []:
    Does your application contain any IMAGE type Lambda functions? [y/N]:

    [4] Summary
    Below is the summary of the answers:
        1 - Account: 00000000000
        2 - Stage configuration name: test
        3 - Region: eu-west-1
        4 - Pipeline user: [to be created]
        5 - Pipeline execution role: [to be created]
        6 - CloudFormation execution role: [to be created]
        7 - Artifacts bucket: [to be created]
        8 - ECR image repository: [skipped]
    Press enter to confirm the values above, or select an item to edit the value:

    This will create the following required resources for the 'test' configuration:
        - Pipeline IAM user
        - Pipeline execution role
        - CloudFormation execution role
        - Artifact bucket
    Should we proceed with the creation? [y/N]: y
        Creating the required resources...
        Successfully created!
    The following resources were created in your account:
        - Pipeline execution role
        - CloudFormation execution role
        - Artifact bucket
        - Pipeline IAM user
    Pipeline IAM user credential:
    AWS_ACCESS_KEY_ID: xxxxxxxxxx
    AWS_SECRET_ACCESS_KEY: xxxxxxxxxx
    View the definition in .aws-sam/pipeline/pipelineconfig.toml,
    run sam pipeline bootstrap to generate another set of resources, or proceed to
    sam pipeline init to create your pipeline configuration file.

    Before running sam pipeline init, we recommend first setting up AWS credentials
    in your CI/CD account. Read more about how to do so with your provider in
    https://docs.aws.amazon.com/serverless-application-model/latest/developerguide/serverless-generating-example-ci-cd-others.html.
A new stack is created for our new stage test.
If you want more than 1 stage you should repeat the
sam pipeline bootstrapfor the new stage (prod?). In this example I only want 1 stage to simplify.
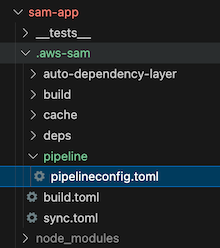
In our SAM project now we have 1 new file containing our stage information:
2.2. Step 2: Generate the pipeline configuration
2.2.1. Two-stage pipeline template
To generate the pipeline configuration, run the command sam pipeline init:
1
sam pipeline init
Click to view command output
    sam pipeline init generates a pipeline configuration file that your CI/CD system
    can use to deploy serverless applications using AWS SAM.
    We will guide you through the process to bootstrap resources for each stage,
    then walk through the details necessary for creating the pipeline config file.

    Please ensure you are in the root folder of your SAM application before you begin.

    Select a pipeline template to get started:
        1 - AWS Quick Start Pipeline Templates
        2 - Custom Pipeline Template Location
    Choice: > 1

    Cloning from https://github.com/aws/aws-sam-cli-pipeline-init-templates.git (process may take a moment)
    Select CI/CD system
    1 - Jenkins
    2 - GitLab CI/CD
    3 - GitHub Actions
    4 - Bitbucket Pipelines
    5 - AWS CodePipeline
    Choice: > 5
    You are using the 2-stage pipeline template.
    _________    _________
    |         |  |         |
    | Stage 1 |->| Stage 2 |
    |_________|  |_________|

        Checking for existing stages...

    Only 1 stage(s) were detected, fewer than what the template requires: 2.

        To set up stage(s), please quit the process using Ctrl+C and use one of the following commands:
        sam pipeline init --bootstrap       To be guided through the stage and config file creation process.
        sam pipeline bootstrap              To specify details for an individual stage.

    To reference stage resources bootstrapped in a different account, press enter to proceed []:
    What is the Git provider?
    1 - Bitbucket
    2 - CodeCommit
    3 - GitHub
    4 - GitHubEnterpriseServer
    Choice []: > 3
    What is the full repository id (Example: some-user/my-repo)?: alazaroc/aws-sam-app
    What is the Git branch used for production deployments? [main]:
    What is the template file path? [template.yaml]:
    We use the stage configuration name to automatically retrieve the bootstrapped resources created when you ran `sam pipeline bootstrap`.

        Here are the stage configuration names detected in .aws-sam/pipeline/pipelineconfig.toml:
            1 - test
        Select an index or enter the stage 1's configuration name (as provided during the bootstrapping): 1
        What is the sam application stack name for stage 1? [sam-app]:
        Stage 1 configured successfully, configuring stage 2.

        Here are the stage configuration names detected in .aws-sam/pipeline/pipelineconfig.toml:
            1 - test
        Select an index or enter the stage 2's configuration name (as provided during the bootstrapping):
        Select an index or enter the stage 2's configuration name (as provided during the bootstrapping):
I have to stop the execution here.
In the console log below, the following is displayed:
- You are using the 2-stage pipeline template
- Only 1 stage(s) were detected, fewer than what the template requires: 2.
In any real project you should have at least two stages, so you could use the default AWS template.
However, I don't want to create two stages in my CI/CD pipeline, I am testing a simple SAM project, and I only want ONE.
Unfortunately, you can’t do that with the
AWS Quick Start Pipeline Templatesso I forked the main AWS project and I created a custom template with only ONE stage.This is my forked project: https://github.com/alazaroc/aws-sam-cli-pipeline-init-templates.git
I had to put my custom template in the root folder because otherwise, the AWS SAM CLI doesn’t work.
2.2.2. One-stage pipeline template
In the next execution, I will select the option Custom Pipeline Template Location and use my updated forked repository to create only one stage in the AWS CodePipeline service.
1
sam pipeline init
Click to view command output
    sam pipeline init generates a pipeline configuration file that your CI/CD system
    can use to deploy serverless applications using AWS SAM.
    We will guide you through the process to bootstrap resources for each stage,
    then walk through the details necessary for creating the pipeline config file.

    Please ensure you are in the root folder of your SAM application before you begin.

    Select a pipeline template to get started:
        1 - AWS Quick Start Pipeline Templates
        2 - Custom Pipeline Template Location
    Choice: 2
    Template Git location: https://github.com/alazaroc/aws-sam-cli-pipeline-init-templates.git

    Cloning from https://github.com/alazaroc/aws-sam-cli-pipeline-init-templates.git (process may take a
    moment)
    You are using the 1-stage pipeline template.
    _________
    |         |
    | Stage 1 |
    |_________|

    Checking for existing stages...

    1 stage(s) were detected, matching the template requirements. If these are incorrect, delete .aws-sam/pipeline/pipelineconfig.toml and rerun
    What is the Git provider?
        1 - Bitbucket
        2 - CodeCommit
        3 - GitHub
        4 - GitHubEnterpriseServer
    Choice []: 3
    What is the full repository id (Example: some-user/my-repo)?: alazaroc/aws-sam-app
    What is the Git branch used for production deployments? [main]:
    What is the template file path? [template.yaml]:
    We use the stage name to automatically retrieve the bootstrapped resources created when you ran `sam pipeline bootstrap`.

    Here are the stage configuration names detected in .aws-sam/pipeline/pipelineconfig.toml:
        1 - test
    What is the name of stage (as provided during the bootstrapping)?
    Select an index or enter the stage name: 1
    What is your sam application stack name? [sam-app]:
    What is the S3 bucket name used for artifacts of SAM deployments? Not the ARN, the name. [aws-sam-cli-managed-test-pipeline--artifactsbucket-gro48levpwla]: aws-sam-cli-managed-test-pipeline--artifactsbucket-gro48levpwla
    What is the prefix of the S3 bucket used for artifacts of SAM deployments? []:
    Stage configured successfully (you only have one stage).

    To deploy this template and connect to the main git branch, run this against the leading account:
    `sam deploy -t codepipeline.yaml --stack-name <stack-name> --capabilities=CAPABILITY_IAM`.
    SUMMARY
    We will generate a pipeline config file based on the following information:
        What is the Git provider?: GitHub
        What is the full repository id (Example: some-user/my-repo)?: alazaroc/aws-sam-app
        What is the Git branch used for production deployments?: main
        What is the template file path?: template.yaml
        What is the name of stage (as provided during the bootstrapping)?
    Select an index or enter the stage name: 1
        What is your sam application stack name?: sam-app
        What is the pipeline execution role ARN for this stage?: arn:aws:iam::00000000000:role/aws-sam-cli-managed-test-pipe-PipelineExecutionRole-Fv4wReTqFrHy
        What is the CloudFormation execution role ARN for this stage?: arn:aws:iam::00000000000ole/aws-sam-cli-managed-test--CloudFormationExecutionRo-4iXZtj3Xzch9
        What is the S3 bucket name used for artifacts of SAM deployments? Not the ARN, the name.: aws-sam-cli-managed-test-pipeline--artifactsbucket-gro48levpwla
        What is the prefix of the S3 bucket used for artifacts of SAM deployments?:
        What is the ECR repository URI for this stage?:
        What is the AWS region?: eu-west-1
    Successfully created the pipeline configuration file(s):
        - codepipeline.yaml
        - assume-role.sh
        - pipeline/buildspec_unit_test.yml
        - pipeline/buildspec_build_package.yml
        - pipeline/buildspec_integration_test.yml
        - pipeline/buildspec_feature.yml
        - pipeline/buildspec_deploy.yml
Now we have the new files in our project that CodePipeline will use to deploy our code:

2.3. Step 3: Commit the pipeline configuration to Git
This step ensures that your CI/CD system recognizes your pipeline configuration and triggers deployments upon code commits.

2.4. Step 4: Deploy the pipeline
For AWS CodePipeline you have to deploy the pipeline running sam deploy -t codepipeline.yaml --stack-name <pipeline-stack-name> --capabilities=CAPABILITY_IAM --region <region-X>
Don’t set the same stack name as your SAM application because doing so will overwrite your application’s stack (and delete your application resources).
1
sam deploy -t codepipeline.yaml --stack-name pipeline-sam-app --capabilities=CAPABILITY_IAM
Click to view command output
            Managed S3 bucket: aws-sam-cli-managed-default-samclisourcebucket-k2z3x0eqvuxq
            A different default S3 bucket can be set in samconfig.toml
            Or by specifying --s3-bucket explicitly.

        Deploying with following values
        ===============================
        Stack name                   : pipeline-sam-app
        Region                       : eu-west-1
        Confirm changeset            : True
        Disable rollback             : False
        Deployment s3 bucket         : aws-sam-cli-managed-default-samclisourcebucket-k2z3x0eqvuxq
        Capabilities                 : ["CAPABILITY_IAM"]
        Parameter overrides          : {}
        Signing Profiles             : {}

    Initiating deployment
    =====================

        Uploading to sam-app/1ac2fdc178c63ba988480068fe211880.template  15696 / 15696  (100.00%)

    Waiting for changeset to be created..

    CloudFormation stack changeset
    -----------------------------------------------------------------------------------------------------
    Operation                 LogicalResourceId         ResourceType              Replacement
    -----------------------------------------------------------------------------------------------------
    + Add                     CodeBuildProjectBuildAn   AWS::CodeBuild::Project   N/A
                            dPackage
    + Add                     CodeBuildProjectDeploy    AWS::CodeBuild::Project   N/A
    + Add                     CodeBuildServiceRole      AWS::IAM::Role            N/A
    + Add                     CodePipelineExecutionRo   AWS::IAM::Role            N/A
                            le
    + Add                     CodeStarConnection        AWS::CodeStarConnection   N/A
                                                        s::Connection
    + Add                     PipelineStackCloudForma   AWS::IAM::Role            N/A
                            tionExecutionRole
    + Add                     Pipeline                  AWS::CodePipeline::Pipe   N/A
                                                        line
    -----------------------------------------------------------------------------------------------------

    Changeset created successfully. arn:aws:cloudformation:eu-west-1:00000000000:changeSet/samcli-deploy1706135069/11d2764f-90e7-4495-b70c-513533ce61d2

    Previewing CloudFormation changeset before deployment
    ======================================================
    Deploy this changeset? [y/N]: > y

    2024-01-24 23:26:04 - Waiting for stack create/update to complete

    CloudFormation events from stack operations (refresh every 5.0 seconds)
    -----------------------------------------------------------------------------------------------------
    ResourceStatus            ResourceType              LogicalResourceId         ResourceStatusReason
    -----------------------------------------------------------------------------------------------------
    CREATE_IN_PROGRESS        AWS::CloudFormation::St   pipeline-sam-app          User Initiated
                            ack
    CREATE_IN_PROGRESS        AWS::IAM::Role            CodeBuildServiceRole      -
    CREATE_IN_PROGRESS        AWS::CodeStarConnection   CodeStarConnection        -
                            s::Connection
    CREATE_IN_PROGRESS        AWS::IAM::Role            PipelineStackCloudForma   -
                                                        tionExecutionRole
    CREATE_IN_PROGRESS        AWS::CodeStarConnection   CodeStarConnection        Resource creation
                            s::Connection                                       Initiated
    CREATE_IN_PROGRESS        AWS::IAM::Role            PipelineStackCloudForma   Resource creation
                                                        tionExecutionRole         Initiated
    CREATE_COMPLETE           AWS::CodeStarConnection   CodeStarConnection        -
                            s::Connection
    CREATE_IN_PROGRESS        AWS::IAM::Role            CodeBuildServiceRole      Resource creation
                                                                                Initiated
    CREATE_COMPLETE           AWS::IAM::Role            PipelineStackCloudForma   -
                                                        tionExecutionRole
    CREATE_COMPLETE           AWS::IAM::Role            CodeBuildServiceRole      -
    CREATE_IN_PROGRESS        AWS::CodeBuild::Project   CodeBuildProjectDeploy    -
    CREATE_IN_PROGRESS        AWS::CodeBuild::Project   CodeBuildProjectBuildAn   -
                                                        dPackage
    CREATE_IN_PROGRESS        AWS::CodeBuild::Project   CodeBuildProjectDeploy    Resource creation
                                                                                Initiated
    CREATE_IN_PROGRESS        AWS::CodeBuild::Project   CodeBuildProjectBuildAn   Resource creation
                                                        dPackage                  Initiated
    CREATE_COMPLETE           AWS::CodeBuild::Project   CodeBuildProjectDeploy    -
    CREATE_COMPLETE           AWS::CodeBuild::Project   CodeBuildProjectBuildAn   -
                                                        dPackage
    CREATE_IN_PROGRESS        AWS::IAM::Role            CodePipelineExecutionRo   -
                                                        le
    CREATE_IN_PROGRESS        AWS::IAM::Role            CodePipelineExecutionRo   Resource creation
                                                        le                        Initiated
    CREATE_COMPLETE           AWS::IAM::Role            CodePipelineExecutionRo   -
                                                        le
    CREATE_IN_PROGRESS        AWS::CodePipeline::Pipe   Pipeline                  -
                            line
    CREATE_IN_PROGRESS        AWS::CodePipeline::Pipe   Pipeline                  Resource creation
                            line                                                Initiated
    CREATE_COMPLETE           AWS::CodePipeline::Pipe   Pipeline                  -
                            line
    CREATE_COMPLETE           AWS::CloudFormation::St   pipeline-sam-app          -
                            ack
    -----------------------------------------------------------------------------------------------------

    CloudFormation outputs from deployed stack
    -------------------------------------------------------------------------------------------------------
    Outputs
    -------------------------------------------------------------------------------------------------------
    Key                 CodeStarConnectionArn
    Description         The Arn of AWS CodeStar Connection used to connect to external code repositories.
    Value               arn:aws:codestar-connections:eu-
    west-1:00000000000:connection/0b2a540b-8af9-490f-91e7-24e26e16a313
    -------------------------------------------------------------------------------------------------------

    Successfully created/updated stack - pipeline-sam-app in eu-west-1
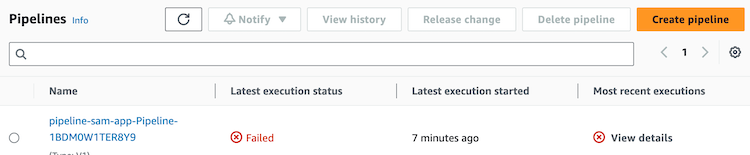
A new stack has been created to deploy our AWS CodePipeline:

Now, we need to access AWS CodePipeline to check the execution.
However, the first execution has failed as we can see in the following image:
We can see in the CodePipeline flow that all steps have been created:
- Source: integrated with GitHub as we indicated before
- UpdatePipeline: the pipeline can update itself
- BuildAndPackage: the SAM application is built, packaged, and uploaded (with AWS CodeBuild service)
- DeployTest: the SAM application is deployed (with AWS CodeBuild service)

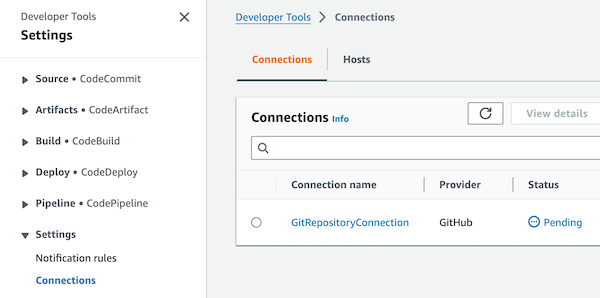
The cause of the error was that the connection between GitHub and AWS must be confirmed after being created:
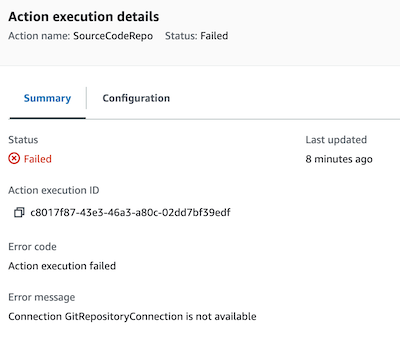
2.5. Step 5: Connect the Git repository with the CI/CD system
If you are using GitHub or Bitbucket, after executing the
sam deploycommand for your pipeline, you need to complete the pending connection in the Settings/Connection section of the Developer Tools.In addition, you could store a copy of the CodeStarConnectionArn from the output of the sam deploy command, because you will need it if you want to use AWS CodePipeline with another branch than main.
By accessing the Settings/Connections in the Developer Tools, you can validate that the connection is pending approval:
After activating it, we run the pipeline again (by clicking on the Release change button) and now the pipeline ends correctly.

3. Update the CI/CD steps in the SAM project
Note that now we have a pipeline that first checks for changes in the pipeline itself and then checks the code and deploys the resources.
3.1. Step 1: Update the steps in the pipeline automatically
With this pipeline configuration (with
UpdatePipelinestep) all the changes that we make in the pipeline will be updated automatically.
We want to test the automatic update of the pipeline if we make some changes.
So, let’s change the pipeline steps to:
- delete the
UpdatePipelinestep - add the
UnitTeststep
To do this, we have to update the codepipeline.yaml file with the necessary changes:
- comment all the
UpdatePipelinestep code - uncomment all the
UnitTeststep code
And after that, commit the changes and push them to the repository:
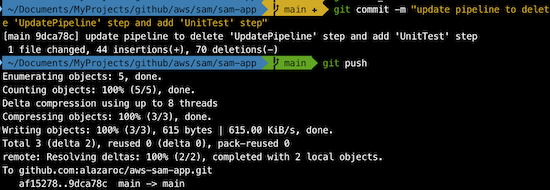
When we push the changes, the UpdatePipeline step executes an update on the pipeline-sam-app stack (in the CloudFormation service) and it will update the pipeline definition.
As we expected, the pipeline has updated itself and now we have UnitTest step but not UpdatePipeline.
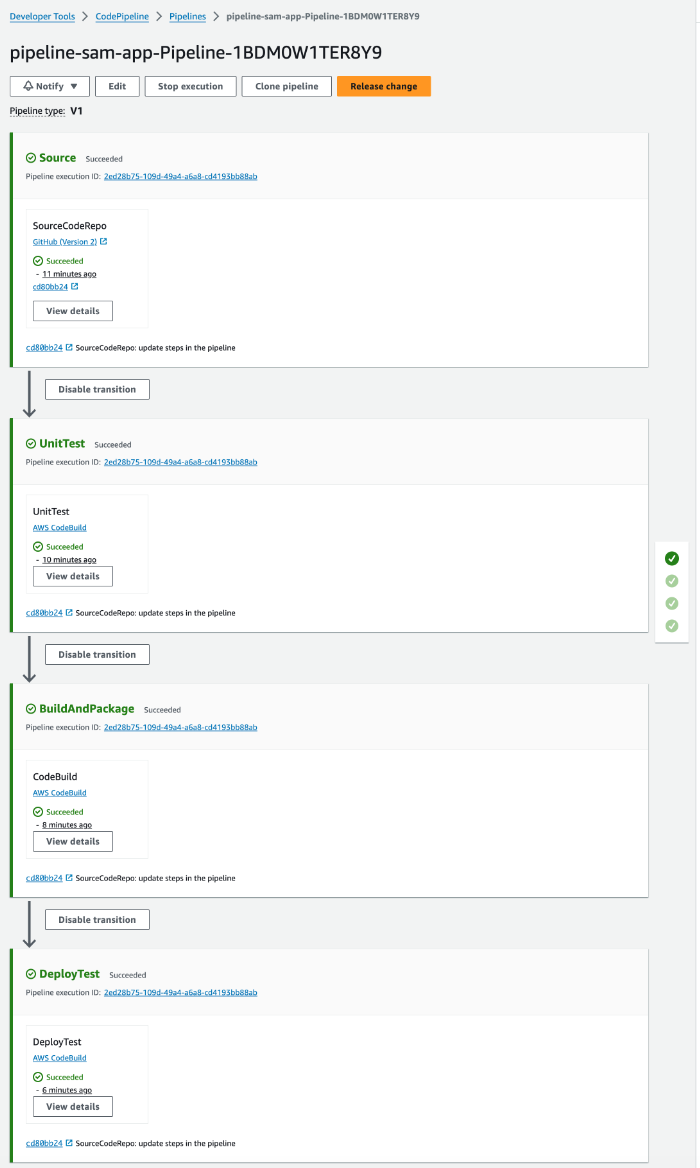
3.2. Step 2: Update the steps in the pipeline manually
If you remove the
UpdatePipelinestep, when you push a change to the repository the pipeline won’t be updated, so you have to run manually the update of the pipeline.
To update the pipeline we have to run again the command sam deploy -t codepipeline.yaml --stack-name pipeline-sam-app --capabilities=CAPABILITY_IAM.
Now, we will remove the UnitTest stage.
1
sam deploy -t codepipeline.yaml --stack-name pipeline-sam-app --capabilities=CAPABILITY_IAM
Click to view command output
        Deploying with following values
        ===============================
        Stack name                   : pipeline-sam-app
        Region                       : eu-west-1
        Confirm changeset            : True
        Disable rollback             : False
        Deployment s3 bucket         : None
        Capabilities                 : ["CAPABILITY_IAM"]
        Parameter overrides          : {}
        Signing Profiles             : {}

    Initiating deployment
    =====================

    Waiting for changeset to be created..

    CloudFormation stack changeset
    -----------------------------------------------------------------------------------------------------
    Operation                 LogicalResourceId         ResourceType              Replacement
    -----------------------------------------------------------------------------------------------------
    * Modify                  CodeBuildProjectBuildAn   AWS::CodeBuild::Project   Conditional
                            dPackage
    * Modify                  CodeBuildProjectDeploy    AWS::CodeBuild::Project   Conditional
    * Modify                  CodeBuildServiceRole      AWS::IAM::Role            False
    * Modify                  CodePipelineExecutionRo   AWS::IAM::Role            False
                            le
    * Modify                  CodeStarConnection        AWS::CodeStarConnection   False
                                                        s::Connection
    * Modify                  PipelineStackCloudForma   AWS::IAM::Role            False
                            tionExecutionRole
    * Modify                  Pipeline                  AWS::CodePipeline::Pipe   False
                                                        line
    - Delete                  CodeBuildProjectUnitTes   AWS::CodeBuild::Project   N/A
                            t
    -----------------------------------------------------------------------------------------------------

    Changeset created successfully. arn:aws:cloudformation:eu-west-1:00000000000:changeSet/samcli-deploy1706140589/27c840fe-922c-4232-861f-51c03d45471c

    Previewing CloudFormation changeset before deployment
    ======================================================
    Deploy this changeset? [y/N]: > y

    2024-01-25 00:57:26 - Waiting for stack create/update to complete

    CloudFormation events from stack operations (refresh every 5.0 seconds)
    -----------------------------------------------------------------------------------------------------
    ResourceStatus            ResourceType              LogicalResourceId         ResourceStatusReason
    -----------------------------------------------------------------------------------------------------
    UPDATE_IN_PROGRESS        AWS::CloudFormation::St   pipeline-sam-app          User Initiated
                            ack
    UPDATE_COMPLETE           AWS::IAM::Role            PipelineStackCloudForma   -
                                                        tionExecutionRole
    UPDATE_COMPLETE           AWS::IAM::Role            CodeBuildServiceRole      -
    UPDATE_COMPLETE           AWS::CodeStarConnection   CodeStarConnection        -
                            s::Connection
    UPDATE_COMPLETE           AWS::CodeBuild::Project   CodeBuildProjectBuildAn   -
                                                        dPackage
    UPDATE_COMPLETE           AWS::CodeBuild::Project   CodeBuildProjectDeploy    -
    UPDATE_IN_PROGRESS        AWS::IAM::Role            CodePipelineExecutionRo   -
                                                        le
    UPDATE_COMPLETE           AWS::IAM::Role            CodePipelineExecutionRo   -
                                                        le
    UPDATE_IN_PROGRESS        AWS::CodePipeline::Pipe   Pipeline                  -
                            line
    UPDATE_COMPLETE           AWS::CodePipeline::Pipe   Pipeline                  -
                            line
    UPDATE_COMPLETE_CLEANUP   AWS::CloudFormation::St   pipeline-sam-app          -
    _IN_PROGRESS              ack
    DELETE_IN_PROGRESS        AWS::CodeBuild::Project   CodeBuildProjectUnitTes   -
                                                        t
    DELETE_COMPLETE           AWS::CodeBuild::Project   CodeBuildProjectUnitTes   -
                                                        t
    UPDATE_COMPLETE           AWS::CloudFormation::St   pipeline-sam-app          -
                            ack
    -----------------------------------------------------------------------------------------------------

    CloudFormation outputs from deployed stack
    -------------------------------------------------------------------------------------------------------
    Outputs
    -------------------------------------------------------------------------------------------------------
    Key                 CodeStarConnectionArn
    Description         The Arn of AWS CodeStar Connection used to connect to external code repositories.
    Value               arn:aws:codestar-connections:eu-
    west-1:00000000000:connection/0b2a540b-8af9-490f-91e7-24e26e16a313
    -------------------------------------------------------------------------------------------------------

    Successfully created/updated stack - pipeline-sam-app in eu-west-1
And the pipeline will be updated:
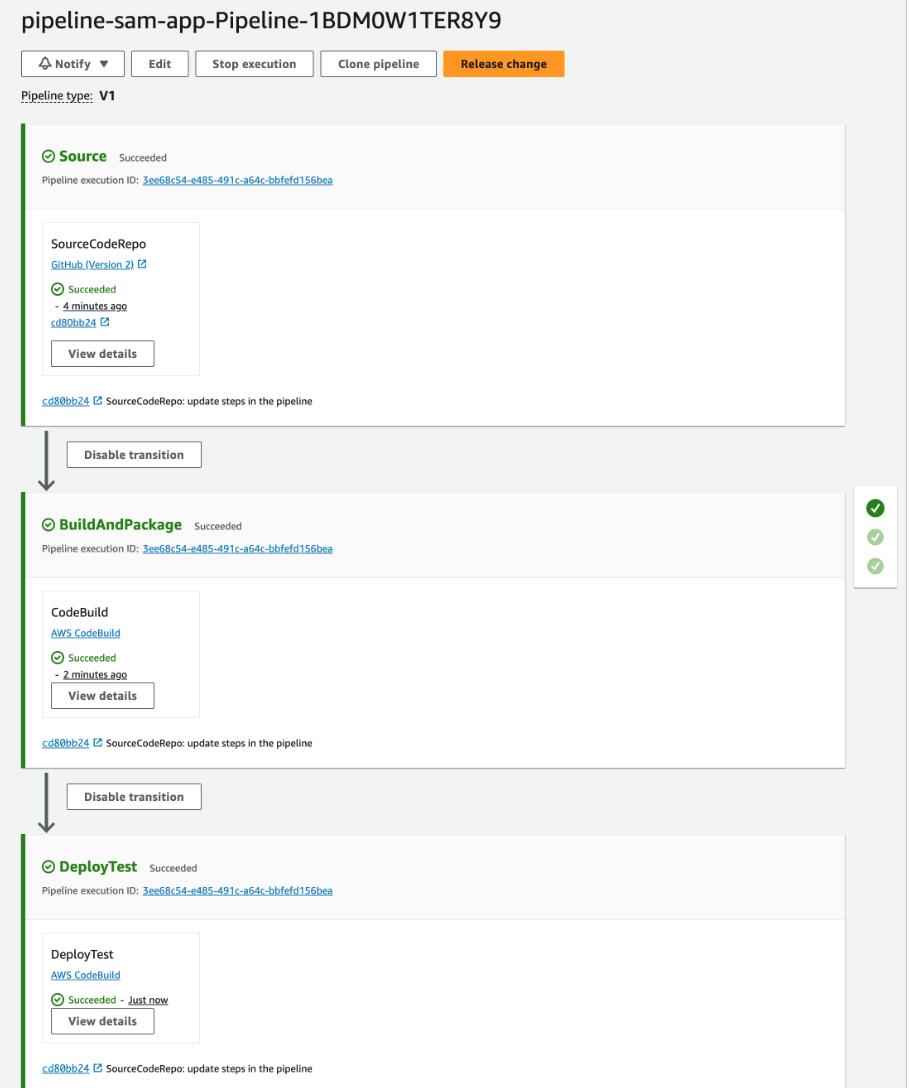
After all the changes that we made:
- Now, we have 3 steps in our CodePipeline:
- Source: integrated with GitHub as we indicated before
- BuildAndPackage: the SAM application is built, packaged, and uploaded (with AWS CodeBuild service)
- DeployTest: the SAM application is deployed (with AWS CodeBuild service)
- To summarize the current state:
- If we change the SAM application and update the code in our GitHub repository, the pipeline will update the resources in our AWS account.
- If we want to update the pipeline itself, we have to update the specific pipeline files in our SAM application, and then run manually the command
- What happens if you want to update the pipeline itself? Then, with the recent changes we did, you have to:
- modify the
codepipeline.yamlfile in our SAM application - manually execute the command
sam deploy -t codepipeline.yaml --stack-name pipeline-sam-app --capabilities=CAPABILITY_IAM.
- modify the
4. Clean up
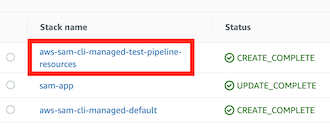
We have created 3 or 4 stacks in CloudFormation related to SAM, depending if you already had used AWS SAM before (then the aws-sam-cli-managed-default already existed):
- aws-sam-cli-managed-default: general SAM resources
- sam-app: application code
- pipeline-sam-app: CI/CD of the sam-app
- aws-sam-cli-managed-test-pipeline-resources: test stage resources
If you want to use AWS SAM in the future you could keep the
aws-sam-cli-managed-defaultstack.
You have several ways to delete your resources:
- AWS CloudFormation service
- AWS CLI
- AWS SAM CLI
If you execute the command
sam delete, it only will delete the main stack (sam-app) but not the CI/CD pipeline or the stage resources stack, so you have to specify the pipeline stack in the second execution.
1
sam delete --stack-name pipeline-sam-app
And don’t forget to remove the environment stack resources:
1
sam delete --stack-name aws-sam-cli-managed-test-pipeline-resources
5. Wrapping It Up
That brings us to the end of our journey of integrating CI/CD into AWS SAM projects. Let’s recap the highlights:
- Ease of Deployment with SAM CLI: We utilized the
sam pipelinecommand for a streamlined deployment process. It’s efficient and simplifies the deployment of SAM applications. - Customizing the Pipeline: Demonstrating AWS SAM’s adaptability, we successfully used a custom template for a single-stage pipeline, allowing for tailored deployment strategies.
- Deployment Automation: Highlighting the power of AWS tools, we’ve automated our deployments, which simplifies application management and ensures our apps are always current.
6. Next steps
Further reading:
- SAM + CDK: Interested in how AWS SAM and AWS CDK can work together? I’ve explored this in another article: How to create serverless applications with CDK and SAM. It’s a great next step for those looking to expand their serverless architecture knowledge.
- CDK: How to create Serverless applications with CDK
- Terraform: How to create Serverless applications with Terraform
Thank you for reading, and I hope this article has been both informative and useful in setting up your CI/CD pipeline. I look forward to hearing your thoughts and experiences with AWS SAM. Feel free to share them in the comments below. Happy coding!