How to deploy a serverless website with Terraform
1. Introduction
As you already know, creating and managing infrastructure can be a complex and time-consuming process, and fortunately, tools like Terraform can simplify this process by allowing you to define your Infrastructure as Code (IaC). In this article, we will explore the basics of Terraform and walk through how to create infrastructure on AWS using it.
However, this is not my first article about Infrastructure as Code tools.
- If you want to know how to create infrastructure using familiar programming languages you can review this article about CDK: How to create infrastructure with CDK
- If you want to create serverless applications on AWS, you can review this other article about SAM: How to create serverless applications with SAM
I have uploaded the source code used in this article in the following GitHub repository https://github.com/alazaroc/aws-terraform-serverless-website
2. What is Terraform?
Terraform is an open-source Infrastructure as Code (IaC) software tool created by HashiCorp. It allows you to define and manage your infrastructure using human-readable configuration files that you can version, reuse, and share. You can then use a consistent workflow to provision and manage all of your infrastructure throughout its lifecycle. Terraform supports a wide range of cloud providers, including AWS, Microsoft Azure, and Google Cloud Platform.
3. How Terraform Works
Terraform uses a declarative configuration language called HashiCorp Configuration Language (HCL).
In a nutshell:
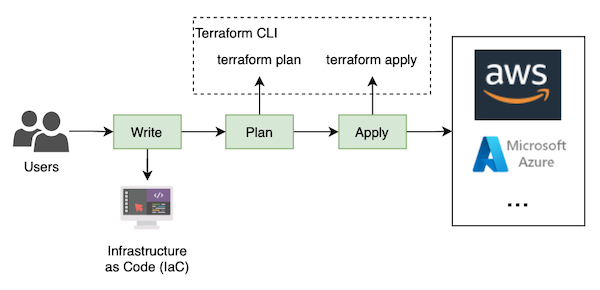
- Write: You define your infrastructure in a series of .tf files, which contain the configuration for your resources
- Plan: Terraform then uses this configuration to generate an execution plan, which outlines the changes that will be made to your infrastructure.
- Apply: Once you have reviewed the execution plan, you can apply it to your infrastructure using the “
terraform apply” command. Terraform will then provision your resources according to the configuration you defined.
4. Getting Started with Terraform
To get started with Terraform, you will need to install it on your machine. You can download the latest version of Terraform from the official website here, and if you want to deploy on AWS, you also need AWS CLI.
Once you have installed Terraform, you can start creating your infrastructure.
In this section, we will review how Terraform works creating a first example to deploy a simple S3 bucket:
Create a new directory for your Terraform configuration file:
1
2
mkdir my-serverless-website
cd my-serverless-website
Create a new file called “main.tf” and there we are going to include the
AWS provider informationwith the “us-east-1” region, and one resource of typeaws_s3_bucketto create an S3 bucket with all the default configuration. Remember that the S3 bucket name must be unique globally.1 2 3 4 5 6 7
provider "aws" { region = "us-east-1" } resource "aws_s3_bucket" "website_bucket" { bucket = "my-unique-bucket-name-12y398y13489148h" }
Initialize your Terraform configuration.
1
terraform init
When you run
terraform init, Terraform downloads and installs the necessary provider plugins and modules required for your configuration. It also initializes the backend, which is the storage location for yourTerraform state file. The state file is used to store the current state of your infrastructure, and it is used by Terraform to plan and apply changes to your infrastructure.Generate an execution plan (optional):
1
terraform plan
This command generates an execution plan based on the configuration in your
main.tffile, and let you check what is going to be deployed.Apply the execution plan to deploy on AWS:
1
terraform apply
When you run
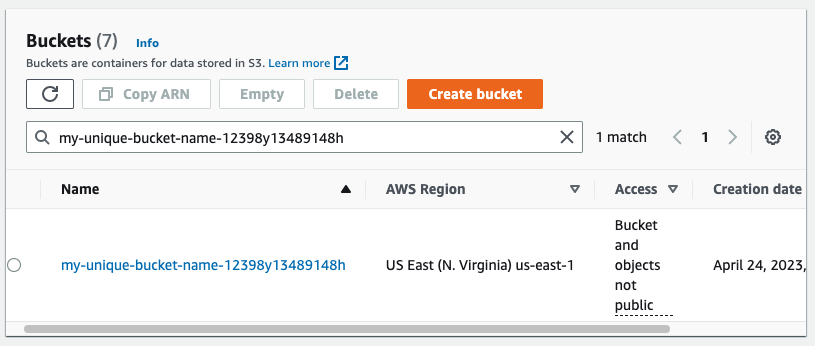
terraform apply, Terraform compares the current state of your infrastructure with the desired state defined in your configuration. It then creates, modifies, or deletes resources as necessary to bring your infrastructure into the desired state. In our example, a new S3 bucket will be deployed.Now, the AWS resources have been created. Let’s check it accessing the AWS S3 service to access the new resource created by Terraform:
We already know how to deploy AWS resources with Terraform, so in the following section, we will evolve the initial example to deploy three serverless websites using S3 bucket.
5. Hands-on: How to deploy a serverless website with Terraform
We have an AWS S3 bucket deployed, and now we are going to use it to host a serverless website. There are different ways to do it, and we are going to evolve the S3 bucket to create a serverless static website.
This is what we are going to build:
- v1.1: public S3 bucket
- Advantage: easy to implement
- Disadvantages: no custom domain, no aligned with security best practices (public bucket), no cache for static files
- v1.2: public S3 as
Static website hosting- Advantages: easy to implement, index document and error page, redirection rules
- Disadvantages: not aligned with security best practices (public bucket), no cache for static files, Amazon S3 website endpoints do not support HTTPS (if you want to use HTTPS, you can use Amazon CloudFront to serve a static website hosted on Amazon S3)
- v2: CloudFront distribution + private S3 bucket
- Advantage: easy to implement, private s3 bucket, cache for static files
- Disadvantages: auto-generated domain name
- v3: Route53 + ACM + CloudFront Distribution + private S3 bucket + optionally Lambda Edge
- Advantages: custom domain name using AWS managed certificates, private s3 bucket, cache for static files
- Disadvantages: more complex to implement
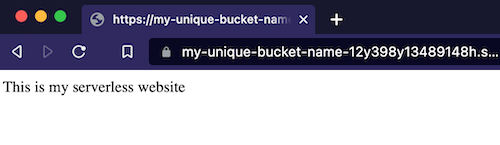
In these examples, we are going to deploy a static website based on an index.html file with this content:
1
This is my serverless website
5.1. v1.1 - public S3 bucket
In this version 1.1 we are going to expose the S3 bucket publicly so any person can access the index.html file using the public S3 endpoint.
- Advantage:
- easy to implement
- Disadvantages:
- no custom domain
- no aligned with security best practices (public bucket)
- no cache for static files
This solution is not aligned with security best practices because it expose an S3 bucket publicly.
Update the file “main.tf” with the following content:
1
2
3
4
5
6
7
8
9
10
11
12
13
14
15
16
17
18
19
20
21
22
23
24
25
26
27
28
29
30
31
32
33
34
35
36
37
38
39
40
41
42
43
44
45
46
47
48
49
provider "aws" {
  region = "us-east-1"
}

resource "aws_s3_bucket" "website_bucket" {
  bucket = "my-unique-bucket-name-12y398y13489148h"
}

resource "aws_s3_object" "website_bucket" {
  bucket       = aws_s3_bucket.website_bucket.id
  key          = "index.html"
  source       = "index.html"
  content_type = "text/html"
}

resource "aws_s3_account_public_access_block" "website_bucket" {
  block_public_acls   = false
  block_public_policy = false
}

resource "aws_s3_bucket_public_access_block" "website_bucket" {
  bucket = aws_s3_bucket.website_bucket.id
  block_public_acls       = false
  block_public_policy     = false
  ignore_public_acls      = false
  restrict_public_buckets = false
}

resource "aws_s3_bucket_policy" "website_bucket" {
  bucket = aws_s3_bucket.website_bucket.id
  policy = jsonencode({
    Version = "2012-10-17"
    Statement = [
      {
        Sid = "PublicReadGetObject"
        Effect = "Allow"
        Principal = "*"
        Action = [
          "s3:GetObject",
          "s3:ListBucket",
        ]
        Resource = [
          "${aws_s3_bucket.website_bucket.arn}",
          "${aws_s3_bucket.website_bucket.arn}/*"
        ]
      }
    ]
  })
}
Now, execute the terraform apply command: terraform apply --auto-approve
Then, open a private window in your browser and access the index.html content using the public endpoint of our S3 bucket. If you have executed the code before, it will be the following URL: https://my-unique-bucket-name-12y398y13489148h.s3.amazonaws.com/index.html
5.2. v1.2 - Static website hosting using S3
In this version, similar to the previous one, we still have exposed the S3 bucket publicly but we will enable the static website hosting feature of S3.
- Advantages:
- easy to implement
- static website includes the configuration of an index document, an error page and also redirection rules
- Disadvantages:
- not aligned with security best practices (public bucket)
- no cache for static files
- Amazon S3 website endpoints do not support HTTPS (if you want to use HTTPS, you can use Amazon CloudFront to serve a static website hosted on Amazon S3)
This solution is not aligned with security best practices because it expose an S3 bucket publicly.
Using the content of the “main.tf” showed in the previous v1.1 example, add at the end of the document the following lines:
1
2
3
4
5
6
resource "aws_s3_bucket_website_configuration" "website_bucket" {
  bucket = aws_s3_bucket.website_bucket.id
  index_document {
    suffix = "index.html"
  }
}
Now, execute the terraform apply command: terraform apply --auto-approve
Then, open a private window in your browser and access through the static website to the index.html content: http://my-unique-bucket-name-12y398y13489148h.s3-website-us-east-1.amazonaws.com/

If you didn’t realize before, look that we are using HTTP, not HTTPS. S3 static website don’t support HTTPS.
5.3. v2 - CloudFront Distribution + private S3 bucket
In this version, we are going to change the bucket to private again (and also, we are going to enable again the Block Public Access settings for this account feature of S3), and we are going to create a CloudFront Distribution connected with the private S3 bucket. So, we are going to access the S3 bucket using the CloudFront distribution.
- Advantage:
- easy to implement
- private s3 bucket (aligned with the security best practices)
- includes a cache for static files
- Disadvantages:
- auto-generated domain name (by CloudFront)
Replace the “main.tf” content with the following lines:
1
2
3
4
5
6
7
8
9
10
11
12
13
14
15
16
17
18
19
20
21
22
23
24
25
26
27
28
29
30
31
32
33
34
35
36
37
38
39
40
41
42
43
44
45
46
47
48
49
50
51
52
53
54
55
56
57
58
59
60
61
62
63
64
65
66
67
68
69
70
71
72
73
74
75
76
77
78
79
80
81
82
83
84
85
86
87
88
89
90
91
92
93
94
95
96
97
provider "aws" {
  region = "us-east-1"
}

resource "aws_s3_bucket" "website_bucket" {
  bucket = "my-unique-bucket-name-12y398y13489148h"
}

resource "aws_s3_account_public_access_block" "website_bucket" {
  block_public_acls   = true
  block_public_policy = true
  ignore_public_acls = true
  restrict_public_buckets = true
}

resource "aws_s3_object" "website_bucket" {
  bucket       = aws_s3_bucket.website_bucket.id
  key          = "index.html"
  source       = "index.html"
  content_type = "text/html"
}

resource "aws_cloudfront_distribution" "cdn_static_site" {
  enabled             = true
  is_ipv6_enabled     = true
  default_root_object = "index.html"
  comment             = "my cloudfront in front of the s3 bucket"

  origin {
    domain_name              = aws_s3_bucket.website_bucket.bucket_regional_domain_name
    origin_id                = "my-s3-origin"
    origin_access_control_id = aws_cloudfront_origin_access_control.default.id
  }

  default_cache_behavior {
    min_ttl                = 0
    default_ttl            = 0
    max_ttl                = 0
    viewer_protocol_policy = "redirect-to-https"

    allowed_methods  = ["GET", "HEAD", "OPTIONS"]
    cached_methods   = ["GET", "HEAD"]
    target_origin_id = "my-s3-origin"

    forwarded_values {
      query_string = false
      cookies {
        forward = "none"
      }
    }
  }

  restrictions {
    geo_restriction {
      locations        = []
      restriction_type = "none"
    }
  }

  viewer_certificate {
    cloudfront_default_certificate = true
  }
}

resource "aws_cloudfront_origin_access_control" "default" {
  name                              = "cloudfront OAC"
  description                       = "description of OAC"
  origin_access_control_origin_type = "s3"
  signing_behavior                  = "always"
  signing_protocol                  = "sigv4"
}

output "cloudfront_url" {
  value = aws_cloudfront_distribution.cdn_static_site.domain_name
}

data "aws_iam_policy_document" "website_bucket" {
  statement {
    actions   = ["s3:GetObject"]
    resources = ["${aws_s3_bucket.website_bucket.arn}/*"]
    principals {
      type        = "Service"
      identifiers = ["cloudfront.amazonaws.com"]
    }
    condition {
      test     = "StringEquals"
      variable = "aws:SourceArn"
      values   = [aws_cloudfront_distribution.cdn_static_site.arn]
    }
  }
}

resource "aws_s3_bucket_policy" "website_bucket_policy" {
  bucket = aws_s3_bucket.website_bucket.id
  policy = data.aws_iam_policy_document.website_bucket.json
}
Now, execute the terraform apply command: terraform apply --auto-approve
Then, open a private window in your browser and access the index.html content using the CloudFront DNS. The execution of the terraform template has as output the URL of the CloudFront Distribution.
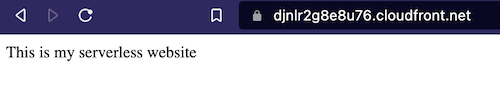
Now, the S3 bucket is private, so if you access to the public endpoint of S3 trying to get the
index.htmlfile you will receive an error
5.4. v3 - Route53 + ACM + CloudFront Distribution + private S3 bucket
In the last example, we will use our domain (registered in Route53) and we will create a certificate using ACM.
- Requirement:
- Required a custom domain
- Advantages:
- custom domain name using AWS-managed certificates
- private s3 bucket (aligned with the security best practices)
- includes a cache for static files
- Disadvantages:
- more complex to implement
To be able to run this example you need your own domain (example.com) and you have to register it in Route53 service. If you don’t have it you can buy a new domain in the Route53 server but it will cost you about 10 dollars per year.
These are the changes that you have to make in the previous “main.tf” file:
Update in your CloudFront Distribution resource
aws_cloudfront_distributionthe following, (where${var.domain_name_simple}is for exampleexample.com):1 2 3
viewer_certificate { cloudfront_default_certificate = true }
replacing it for this:
1
2
3
4
5
6
7
8
9
10
  viewer_certificate {
    acm_certificate_arn      = aws_acm_certificate.cert.arn
    ssl_support_method       = "sni-only"
    minimum_protocol_version = "TLSv1.2_2021"
  }

  aliases = [
    var.domain_name_simple,
    var.domain_name
  ]
Next, add the following lines:
1
2
3
4
5
6
7
8
9
10
11
12
13
14
15
16
17
18
19
20
21
22
23
24
25
26
27
28
29
30
31
32
33
34
35
36
37
38
39
40
41
42
43
44
45
46
47
48
49
50
51
52
53
54
55
56
57
58
59
60
61
62
63
64
resource "aws_acm_certificate" "cert" {
  provider                  = aws.use_default_region
  domain_name               = "*.${var.domain_name_simple}"
  validation_method         = "DNS"
  subject_alternative_names = [var.domain_name_simple]

  lifecycle {
    create_before_destroy = true
  }
}

data "aws_route53_zone" "zone" {
  provider     = aws.use_default_region
  name         = var.domain_name_simple
  private_zone = false
}

resource "aws_route53_record" "cert_validation" {
  provider = aws.use_default_region
  for_each = {
    for dvo in aws_acm_certificate.cert.domain_validation_options : dvo.domain_name => {
      name   = dvo.resource_record_name
      record = dvo.resource_record_value
      type   = dvo.resource_record_type
    }
  }

  allow_overwrite = true
  name            = each.value.name
  records         = [each.value.record]
  type            = each.value.type
  zone_id         = data.aws_route53_zone.zone.zone_id
  ttl             = 60
}

resource "aws_acm_certificate_validation" "cert" {
  provider                = aws.use_default_region
  certificate_arn         = aws_acm_certificate.cert.arn
  validation_record_fqdns = [for record in aws_route53_record.cert_validation : record.fqdn]
}

resource "aws_route53_record" "www" {
  zone_id = data.aws_route53_zone.zone.id
  name    = "www.${var.domain_name_simple}"
  type    = "A"

  alias {
    name                   = aws_cloudfront_distribution.cdn_static_site.domain_name
    zone_id                = aws_cloudfront_distribution.cdn_static_site.hosted_zone_id
    evaluate_target_health = false
  }
}

resource "aws_route53_record" "apex" {
  zone_id = data.aws_route53_zone.zone.id
  name    = var.domain_name_simple
  type    = "A"

  alias {
    name                   = aws_cloudfront_distribution.cdn_static_site.domain_name
    zone_id                = aws_cloudfront_distribution.cdn_static_site.hosted_zone_id
    evaluate_target_health = false
  }
}
Now, execute the terraform apply command:
terraform apply --auto-approveFinally, open a private window in your browser and access your registered domain: https://example.com
6. Conclusion
In this article, we have explored the basics of Terraform and walked through how to create infrastructure with different examples. With Terraform, you can define your infrastructure as code and automate the process of creating and updating your resources.
This example is based on the code I have created to deploy my own blog https://playingaws.com using Route53 + ACM + CloudFront Distribution + private S3 bucket.
7. Next steps
Further reading (IaC):
- CDK: How to create Serverless applications with CDK
- SAM: How to create Serverless applications with SAM
- SAM + CDK: Interested in how AWS SAM and AWS CDK can work together? I’ve explored this in another article: How to create serverless applications with CDK and SAM. It’s a great next step for those looking to expand their serverless architecture knowledge.
I look forward to hearing your thoughts and experiences with AWS SAM. Feel free to share them in the comments below. Happy coding!