How to create serverless applications with AWS SAM (Serverless Application Model)
1. Introduction
The first thing to understand is the relationship between serverless applications and AWS SAM, followed by a review of the basics.
1.1. What is a serverless application?
A serverless application is more than just a Lambda Function. It is a combination of Lambda functions, event sources, APIs, databases, and other resources that work together to perform tasks.
1.2. What is AWS SAM?
The AWS Serverless Application Model (AWS SAM) is an open-source framework that you can use to build serverless applications on AWS. SAM is an extension of AWS CloudFormation but SAM is streamlined and specifically designed for Serverless resources.
SAM is the specific IaC solution of AWS for defining and deploying serverless applications.
1.3. Benefits of SAM
- Local Testing and Debugging
- With the
aws sam cliyou can execute and test your serverless applications on your local environment (by mounting a docker image and running the code)
- With the
- Extension of AWS Cloud Formation
- You get reliability on the deployment capabilities
- You can use the
SAM yaml templatewith all of the resources that are available in CloudFormation
- Single Deployment Configuration
- You can easily manage all your necessary resources in one single place that belongs to the same stack
- Built-in best practices
- You can define and deploy your Infrastructure as Config
- you can enforce code reviews
- you can enable safe deployments through
CodeDeploy - you can enable tracing by using
AWS X-Ray
- You can define and deploy your Infrastructure as Config
- Deep integration with development tools
- AWS Serverless Application Repository: discover new applications
- AWS Cloud9 IDE: For authoring, testing, and debugging. I have written a post about Cloud9; you can find it here
- CodeBuild, CodeDeploy, and CodePipeline: To build a deployment pipeline
- AWS CodeStar: To get started with a project structure, code repository, and a CI/CD pipeline that’s automatically configured for you
1.4. Basics
We will use
NodeJSas programming language. However, as AWS Says in the FAQs, you can use AWS SAM to build serverless applications that use any runtime supported by AWS Lambda.
To understand the code structure of the SAM projects, five files are particularly important:
Common to all the programming languages:
- template.yaml: This file contains the AWS SAM template that defines your application’s AWS resources.
- events/file.json:
eventsfolder contains the invocation events that you can use to invoke the function.
Depends on the programming language (in this case
NodeJS), so it will be different in each case (but the idea is the same):- src/handlers/file.js:
srcfolder contains the code for the application’s Lambda Function. - __tests__/unit/handlers/file.test.js:
testfolder contains the unit tests for the application code. - package.json: This file of NodeJS contains the application dependencies and is used for the
sam build. If you are using Python language instead of NodeJS, the file will be requirements.txt.
- src/handlers/file.js:
1.5. AWS SAM template anatomy
This is the structure of the template.yaml.
1
2
3
4
5
6
7
8
9
10
11
12
13
14
15
16
17
18
19
20
21
22
23
24
25
26
27
28
29
30
31
32
33
34
35
36
37
38
39
40
41
42
43
44
45
46
# The AWSTemplateFormatVersion identifies the capabilities of the template
# https://docs.aws.amazon.com/AWSCloudFormation/latest/UserGuide/format-version-structure.html
AWSTemplateFormatVersion: '2010-09-09'
# Optional: description
Description: >-
  Any text here.
  Multi-line

# Transform section specifies one or more macros that AWS CloudFormation uses to process your template
# https://docs.aws.amazon.com/AWSCloudFormation/latest/UserGuide/transform-section-structure.html
Transform: AWS::Serverless-2016-10-31

# Optional: Globals section defines properties that are common to all your serverless functions and APIs
Globals:
  Function:
    Timeout: 3
    MemorySize: 128
    Tracing: Active
    Tags:
      iac: SAM

# Optional: provides additional information about the template
Metadata:
  template metadata

# Optional: Values to pass to your template at runtime (when you create or update a stack).
Parameters:
  set of parameters

# Optioal: A mapping of keys and associated values that you can use to specify conditional parameter values, similar to a lookup table
Mappings:
  set of mappings

# Optional: conditions that control whether certain resources are created or whether certain resource properties are assigned a value during stack creation or update
Conditions:
  set of conditions

# Resources declares the AWS resources that you want to include in the stack.
# Resources section can contain a combination of AWS CloudFormation resources and AWS SAM resources
# https://docs.aws.amazon.com/AWSCloudFormation/latest/UserGuide/resources-section-structure.html
Resources:
  set of resources

# Optional: The values that are returned whenever you view your stack's properties
Outputs:
  set of outputs
More information here.
1.6. Prerequisites
- AWS CLI
- AWS SAM CLI (here)
2. Building SAM Applications
Let’s start reviewing one example of the SAM application to show some options about what we can do here.
I will show you the part of the template.yaml file which affects the specific service.
It’s important to remember that you can incorporate CloudFormation resources into our SAM template. However, AWS SAM offers specific resources that are specially tailored for creating Lambda Functions, API Gateway, AppSync, DynamoDB, Step Functions, among several other services. All the relevant information can be found here.
2.1. Example of Lambda Function
The first special type, and more important, is the AWS::Serverless::Function, which you should use to create Lambda Functions (more information here).
1
2
3
4
5
6
7
8
9
10
11
12
13
14
15
16
17
18
Resources:
  # Each Lambda function is defined by properties:
  # https://github.com/awslabs/serverless-application-model/blob/master/versions/2016-10-31.md#awsserverlessfunction

  # This is a Lambda function config associated with the source code: hello-from-lambda.js
  HelloWorldFunction:
    Type: AWS::Serverless::Function
    Properties:
      Handler: src/handlers/hello-from-lambda.helloFromLambdaHandler
      Runtime: nodejs14.x
      Architectures:
        - x86_64
      MemorySize: 128
      Timeout: 100
      Description: A Lambda function that returns a static string.
      Policies:
        # Give Lambda basic execution Permission to the helloFromLambda
        - AWSLambdaBasicExecutionRole
2.2. Adding an API Gateway
To add the API Gateway resource you can use the specific type of AWS::Serverless::Api (more information here).
1
2
3
4
5
6
7
8
Resources:
  ...
  BasicAWSApiGateway:
    Type: AWS::Serverless::Api
    Properties:
      Name: Basic Amazon API Gateway resource
      StageName: poc
      ...
You can also add a trigger in the Lambda Function updating the section Events:
1
2
3
4
5
6
7
8
9
10
Resources:
  HelloWorldFunction:
    Properties:
      ...
      Events:
        HelloWorld:
          Type: Api
          Properties:
            Path: /
            Method: get
And you should create in events folder the json definition of the method:
1
2
3
{
    "httpMethod": "GET"
}
2.3. Adding an scheduled event to the Lambda Function
Including a scheduled event to the Lambda Function is quite similar to adding an API.
1
2
3
4
5
6
7
8
9
Resources:
  HelloWorldFunction:
    Properties:
      ...
      Events:
        CloudWatchEvent:
          Type: Schedule
          Properties:
            Schedule: cron(0 * * * ? *)
And you should create in events folder the json definition of the rule:
1
2
3
4
5
6
7
8
9
10
11
12
{
  "id": "cdc73f9d-aea9-11e3-9d5a-835b769c0d9c",
  "detail-type": "Scheduled Event",
  "source": "aws.events",
  "account": "",
  "time": "1970-01-01T00:00:00Z",
  "region": "us-west-2",
  "resources": [
    "arn:aws:events:us-west-2:xxxxxxxxxxxx:rule/ExampleRule"
  ],
  "detail": {}
}
2.4. Adding the SNS topic resource
In this case, I will include the Lambda Function as a subscriber of my SNS topic.
1
2
3
4
5
6
7
8
9
10
11
Resources:
  ...
  SnsTopicAsTriggerOfLambdaFunction:
    Type: AWS::SNS::Topic
    Properties:
      TopicName: !Sub '${ResourcesName}'
      DisplayName : Topic used for trigger the lambda function
      Subscription:
        - Protocol: lambda
          Endpoint: !GetAtt HelloWorldFunction.Arn
      TracingConfig: Active
2.5. Saving one property in the SSM Parameter Store
1
2
3
4
5
6
7
8
Resources:
  ...
  MySnsTopicArnParameter:
      Type: AWS::SSM::Parameter
      Properties:
        Name: /general/sns/topic-test
        Type: String
        Value: !Ref SnsTopicAsTriggerOfLambdaFunction
2.6. More examples
As you can see, you can add any resource using the usual CloudFormation code inside the template.yaml file.
I recommend that you run
aws sam initand try to create different projects from the templates.
3. Hands-on: Creating a new SAM application
To keep it simple, we will create a SAM application from a quick start template using the standalone function. However you could try a different template, the steps to follow should be the same.
The code example is available in
GitHubrepository here. If you want to see the step by step you can check the commit history, where you can find the evolution of the application through the steps explained in the following lines.
These are all the steps that I want to show you in this article:
- Step 1: Download a sample SAM application
- Step 2 (Optional): Test your application locally
- Step 3 (Optional): Unit test
- Step 4: Build your application
- Step 5: Deploy manually your application with the CLI
- Step 6 (Optional): AWS SAM Accelerate (Preview) - Sync
3.1. Step 1: Download a sample SAM application
The first step is to create our application through a quick start template: Standalone function.
To create a new application from a template we run the sam init command.
1
sam init
Click to view command output
  Which template source would you like to use?
  1 - AWS Quick Start Templates
  2 - Custom Template Location
  Choice: > 1

  Choose an AWS Quick Start application template
    1 - Hello World Example
    2 - Data processing
    3 - Hello World Example with Powertools for AWS Lambda
    4 - Multi-step workflow
    5 - Scheduled task
    6 - Standalone function
    7 - Serverless API
    8 - Infrastructure event management
    9 - Lambda Response Streaming
    10 - Serverless Connector Hello World Example
    11 - Multi-step workflow with Connectors
    12 - GraphQLApi Hello World Example
    13 - Full Stack
    14 - Lambda EFS example
    15 - Hello World Example With Powertools for AWS Lambda
    16 - DynamoDB Example
    17 - Machine Learning
  Template: > 6

  Which runtime would you like to use?
    1 - dotnet6
    2 - nodejs20.x
    3 - nodejs18.x
    4 - nodejs16.x
  Runtime: > 2

  Based on your selections, the only Package type available is Zip.
  We will proceed to selecting the Package type as Zip.

Based on your selections, the only dependency manager available is npm.
We will proceed copying the template using npm.

  Project name [sam-app]: > sam-app

      -----------------------
      Generating application:
      -----------------------
      Name: sam-app
      Runtime: nodejs20.x
      Architectures: x86_64
      Dependency Manager: npm
      Application Template: quick-start-from-scratch
      Output Directory: .
      Configuration file: sam-app/samconfig.toml

      Next steps can be found in the README file at sam-app/README.md


  Commands you can use next
  =========================
  [*] Create pipeline: cd sam-app && sam pipeline init --bootstrap
  [*] Validate SAM template: cd sam-app && sam validate
  [*] Test Function in the Cloud: cd sam-app && sam sync --stack-name {stack-name} --watch
At the end of the command line messages appears
Commands you can use next, where other SAM CLI commands are suggested as the next steps to execute.
This is the basic application that has been created (only with one lambda function for easy understanding):
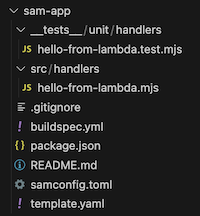
Note that we have 4 of the 5 files that we reviewed before:
- src/handlers/hello-from-lambda.js
- _test_/unit/handlers/hello-from-lambda.test.js
- template.yaml
- package.json
We don’t have the folder events because we only create one simple Lambda Function with no event integrations
3.2. Step 2 (Optional): Test your application locally
The AWS SAM CLI provides the sam local command to run your application using Docker containers that simulate the execution environment of Lambda.
Invoke your Lambda function running sam local invoke:
1
sam local invoke
Click to view command output
  Invoking src/handlers/hello-from-lambda.helloFromLambdaHandler (nodejs20.x)
  Local image was not found.
  Removing rapid images for repo public.ecr.aws/sam/emulation-nodejs20.x
  Building image.............................................................................................................................................................................................................................................................................
  Using local image: public.ecr.aws/lambda/nodejs:20-rapid-x86_64.

  Mounting /Users/alazaroc/Documents/MyProjects/github/aws/sam/sam-app as /var/task:ro,delegated, inside
  runtime container
  START RequestId: ba22ff8c-02f8-42a7-980d-0f0248ee63bf Version: $LATEST
  2024-01-22T22:11:35.245Z	ae4b9347-e347-4ec0-a7a1-f34a3533ec8b	INFO	Hello from Lambda!
  END RequestId: ae4b9347-e347-4ec0-a7a1-f34a3533ec8b
  REPORT RequestId: ae4b9347-e347-4ec0-a7a1-f34a3533ec8b	Init Duration: 0.06 ms	Duration: 181.07 ms	Billed Duration: 182 ms	Memory Size: 128 MB	Max Memory Used: 128 MB
  "Hello from Lambda!"
We received the response "Hello from Lambda!" and more useful information (Duration, Billed Duration, Memory Size, or Max Memory Used).
If you have more than one Lambda Function, you must add the name which appears in the template.yaml file.
1
sam local invoke "helloFromLambdaFunction"
Click to view command output
  Invoking src/handlers/hello-from-lambda.helloFromLambdaHandler (nodejs20.x)
  Local image is up-to-date
  Using local image: public.ecr.aws/lambda/nodejs:20-rapid-x86_64.

  Mounting /Users/alazaroc/Documents/MyProjects/github/aws/sam/sam-app as /var/task:ro,delegated, inside
  runtime container
  START RequestId: 323bbea4-2d41-407d-97b6-8605cbe454c3 Version: $LATEST
  2024-01-22T22:20:25.541Z	9fadbf3c-0c9f-4728-b1a7-4ab96e715172	INFO	Hello from Lambda!
  END RequestId: 9fadbf3c-0c9f-4728-b1a7-4ab96e715172
  REPORT RequestId: 9fadbf3c-0c9f-4728-b1a7-4ab96e715172	Init Duration: 0.05 ms	Duration: 142.91 ms	Billed Duration: 143 ms	Memory Size: 128 MB	Max Memory Used: 128 MB
  "Hello from Lambda!"
You also can test an API locally if your SAM project includes it.
You should run
sam local start-apicommand, which starts up a local endpoint that replicates your REST API endpoint.
3.3. Step 3 (Optional): Unit test
Tests are defined in the __tests__ folder in this project. Use npm to install the Jest test framework and run unit tests.
1
2
3
npm install
...
npm run test
Click to view command output
  > replaced-by-user-input@0.0.1 test
  > node --experimental-vm-modules node_modules/jest/bin/jest.js

    console.info
      Hello from Lambda!

        at helloFromLambdaHandler (src/handlers/hello-from-lambda.mjs:9:13)

  (node:31412) ExperimentalWarning: VM Modules is an experimental feature and might change at any time
  (Use `node --trace-warnings ...` to show where the warning was created)
  PASS  __tests__/unit/handlers/hello-from-lambda.test.mjs
    Test for hello-from-lambda
      ✓ Verifies successful response (30 ms)

  Test Suites: 1 passed, 1 total
  Tests:       1 passed, 1 total
  Snapshots:   0 total
  Time:        0.553 s
  Ran all test suites.
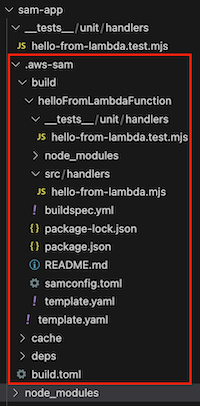
3.4. Step 4: Build your application
The sam build command builds any dependencies that your application has, and copies your application source code to folders under .aws-sam/build to be zipped and uploaded to Lambda.
1
sam build
Click to view command output
  Starting Build use cache
  Manifest file is changed (new hash: 57574ed173cdc6a98b283bd7b00b44ca) or dependency folder
  (.aws-sam/deps/ee51225c-b9b8-433f-ab8b-3821871f820a) is missing for (helloFromLambdaFunction), downloading
  dependencies and copying/building source
  Building codeuri: /Users/alazaroc/Documents/MyProjects/github/aws/sam/sam-app runtime: nodejs20.x metadata:
  {} architecture: x86_64 functions: helloFromLambdaFunction
  Running NodejsNpmBuilder:NpmPack
  Running NodejsNpmBuilder:CopyNpmrcAndLockfile
  Running NodejsNpmBuilder:CopySource
  Running NodejsNpmBuilder:NpmInstall
  Running NodejsNpmBuilder:CleanUp
  Running NodejsNpmBuilder:CopyDependencies
  Running NodejsNpmBuilder:CleanUpNpmrc
  Running NodejsNpmBuilder:LockfileCleanUp
  Running NodejsNpmBuilder:LockfileCleanUp

  Build Succeeded

  Built Artifacts  : .aws-sam/build
  Built Template   : .aws-sam/build/template.yaml

  Commands you can use next
  =========================
  [*] Validate SAM template: sam validate
  [*] Invoke Function: sam local invoke
  [*] Test Function in the Cloud: sam sync --stack-name  --watch
  [*] Deploy: sam deploy --guided
These are the new files of our SAM project:
3.5. Step 5: Deploy manually your application with the CLI
Now we want to deploy our application and We will do it manually using the CLI, although in this other article I will explain how to do it with a pipeline (automatically).
Remember that AWS SAM uses AWS CloudFormation as the underlying deployment mechanism.
As we don’t have a configuration file containing all the values, we are going to create one. We run the sam deploy -- guided command which will search as a first step if a samconfig.toml file exists and if not the AWS SAM CLI will ask us about the necessary information to deploy our application.
The
sam deploycommand will package and upload the application artifacts to the S3 bucket, and deploys the application using AWS CloudFormation
1
sam deploy --guided
Click to view command output
  Configuring SAM deploy
  ======================

    Looking for config file [samconfig.toml] :  Found
    Reading default arguments  :  Success

    Setting default arguments for 'sam deploy'
    =========================================
    Stack Name [sam-app]:
    AWS Region [eu-west-1]:
    #Shows you resources changes to be deployed and require a 'Y' to initiate deploy
    Confirm changes before deploy [Y/n]:
    #SAM needs permission to be able to create roles to connect to the resources in your template
    Allow SAM CLI IAM role creation [Y/n]:
    #Preserves the state of previously provisioned resources when an operation fails
    Disable rollback [y/N]:
    Save arguments to configuration file [Y/n]:
    SAM configuration file [samconfig.toml]:
    SAM configuration environment [default]:

    Looking for resources needed for deployment:

    Managed S3 bucket: aws-sam-cli-managed-default-samclisourcebucket-k2z3x0eqvuxq
    A different default S3 bucket can be set in samconfig.toml and auto resolution of buckets turned off by setting resolve_s3=False

          Parameter "stack_name=sam-app" in [default.deploy.parameters] is defined as a global parameter
  [default.global.parameters].
          This parameter will be only saved under [default.global.parameters] in
  /Users/alazaroc/Documents/MyProjects/github/aws/sam/sam-app/samconfig.toml.

    Saved arguments to config file
    Running 'sam deploy' for future deployments will use the parameters saved above.
    The above parameters can be changed by modifying samconfig.toml
    Learn more about samconfig.toml syntax at
    https://docs.aws.amazon.com/serverless-application-model/latest/developerguide/serverless-sam-cli-config.html

    Uploading to sam-app/c20f3d4923fb213486783dd25f269a52  38478 / 38478  (100.00%)

    Deploying with following values
    ===============================
    Stack name                   : sam-app
    Region                       : eu-west-1
    Confirm changeset            : True
    Disable rollback             : False
    Deployment s3 bucket         : aws-sam-cli-managed-default-samclisourcebucket-k2z3x0eqvuxq
    Capabilities                 : ["CAPABILITY_IAM"]
    Parameter overrides          : {}
    Signing Profiles             : {}

  Initiating deployment
  =====================

    Uploading to sam-app/3752a1ab023524618cd64cc55081484c.template  734 / 734  (100.00%)


  Waiting for changeset to be created..

  CloudFormation stack changeset
  -------------------------------------------------------------------------------------------------------------
  Operation                   LogicalResourceId           ResourceType                Replacement
  -------------------------------------------------------------------------------------------------------------
  + Add                       helloFromLambdaFunctionRo   AWS::IAM::Role              N/A
                              le
  + Add                       helloFromLambdaFunction     AWS::Lambda::Function       N/A
  -------------------------------------------------------------------------------------------------------------


  Changeset created successfully. arn:aws:cloudformation:eu-west-1:000000000000:changeSet/samcli-deploy1705962828/ee61a1a2-9083-4029-9ee1-126661b04541


  Previewing CloudFormation changeset before deployment
  ======================================================
  Deploy this changeset? [y/N]: y

  2024-01-22 23:34:17 - Waiting for stack create/update to complete

  CloudFormation events from stack operations (refresh every 5.0 seconds)
  -------------------------------------------------------------------------------------------------------------
  ResourceStatus              ResourceType                LogicalResourceId           ResourceStatusReason
  -------------------------------------------------------------------------------------------------------------
  CREATE_IN_PROGRESS          AWS::CloudFormation::Stac   sam-app                     User Initiated
                              k
  CREATE_IN_PROGRESS          AWS::IAM::Role              helloFromLambdaFunctionRo   -
                                                          le
  CREATE_IN_PROGRESS          AWS::IAM::Role              helloFromLambdaFunctionRo   Resource creation
                                                          le                          Initiated
  CREATE_COMPLETE             AWS::IAM::Role              helloFromLambdaFunctionRo   -
                                                          le
  CREATE_IN_PROGRESS          AWS::Lambda::Function       helloFromLambdaFunction     -
  CREATE_IN_PROGRESS          AWS::Lambda::Function       helloFromLambdaFunction     Resource creation
                                                                                      Initiated
  CREATE_COMPLETE             AWS::Lambda::Function       helloFromLambdaFunction     -
  CREATE_COMPLETE             AWS::CloudFormation::Stac   sam-app                     -
                              k
  -------------------------------------------------------------------------------------------------------------


  Successfully created/updated stack - sam-app in eu-west-1
Remember that the executed command will create the samconfig.toml file in our project to save the deployment configuration and be able to repeat it without configuration.
From now on, to deploy our SAM project we just need to run the sam deploy command, so we run it but if we have no changes, the deployment will fail:
1
sam deploy
Click to view command output
      Managed S3 bucket: aws-sam-cli-managed-default-samclisourcebucket-k2z3x0eqvuxq
      A different default S3 bucket can be set in samconfig.toml
      Or by specifying --s3-bucket explicitly.
  File with same data already exists at sam-app/c20f3d4923fb213486783dd25f269a52, skipping upload

    Deploying with following values
    ===============================
    Stack name                   : sam-app
    Region                       : eu-west-1
    Confirm changeset            : True
    Disable rollback             : False
    Deployment s3 bucket         : aws-sam-cli-managed-default-samclisourcebucket-k2z3x0eqvuxq
    Capabilities                 : ["CAPABILITY_IAM"]
    Parameter overrides          : {}
    Signing Profiles             : {}

  Initiating deployment
  =====================

  File with same data already exists at sam-app/3752a1ab023524618cd64cc55081484c.template, skipping upload


  Waiting for changeset to be created..

  Error: No changes to deploy. Stack sam-app is up to date
3.6. Step 6 (Optional): AWS SAM Sync
We already have deployed our application in the cloud and you may want to synchronize the changes, i.e. deploy the changes in real-time when we save the changes (without running the deploy command).
The
sam synccommand syncs your local application changes to the AWS Cloud. Use sync to build, package, and deploy changes to your development environment as you iterate on your application. As a best practice, run sam sync after you finish iterating on your application to sync changes to your AWS CloudFormation stack.
Be careful if you use this functionality.
First
it is in previewand also as you will see in the next lines in the console: “The SAM CLI will use the AWS Lambda, Amazon API Gateway, and AWS StepFunctions APIs toupload your code without performing a CloudFormation deployment. This will cause drift in your CloudFormation stack.”The sync command should only be used against a development stack.
1
sam sync --stack-name sam-app --watch
Click to view command output
  The SAM CLI will use the AWS Lambda, Amazon API Gateway, and AWS StepFunctions APIs to upload your code without
  performing a CloudFormation deployment. This will cause drift in your CloudFormation stack.
  **The sync command should only be used against a development stack**.

  Confirm that you are synchronizing a development stack.

  Enter Y to proceed with the command, or enter N to cancel:
  [Y/n]:
  Queued infra sync. Waiting for in progress code syncs to complete...
  Starting infra sync.
  Manifest is not changed for (helloFromLambdaFunction), running incremental build
  Building codeuri: /Users/alazaroc/Documents/MyProjects/github/aws/sam/sam-app runtime: nodejs20.x
  metadata: {} architecture: x86_64 functions: helloFromLambdaFunction
  Running NodejsNpmBuilder:NpmPack
  Running NodejsNpmBuilder:CopyNpmrcAndLockfile
  Running NodejsNpmBuilder:CopySource
  Running NodejsNpmBuilder:CleanUpNpmrc
  Running NodejsNpmBuilder:LockfileCleanUp
  Running NodejsNpmBuilder:LockfileCleanUp

  Build Succeeded

  Successfully packaged artifacts and wrote output template to file /var/folders/wq/bz6xngtx5h3f5gf8py3kf28c0000gn/T/tmppcg60qga.
  Execute the following command to deploy the packaged template
  sam deploy --template-file /var/folders/wq/bz6xngtx5h3f5gf8py3kf28c0000gn/T/tmppcg60qga --stack-name <YOUR STACK NAME>


    Deploying with following values
    ===============================
    Stack name                   : sam-app
    Region                       : eu-west-1
    Disable rollback             : False
    Deployment s3 bucket         : aws-sam-cli-managed-default-samclisourcebucket-k2z3x0eqvuxq
    Capabilities                 : ["CAPABILITY_NAMED_IAM", "CAPABILITY_AUTO_EXPAND"]
    Parameter overrides          : {}
    Signing Profiles             : null

  Initiating deployment
  =====================


  2024-01-22 23:43:31 - Waiting for stack create/update to complete

  CloudFormation events from stack operations (refresh every 0.5 seconds)
  ---------------------------------------------------------------------------------------------------------
  ResourceStatus             ResourceType               LogicalResourceId          ResourceStatusReason
  ---------------------------------------------------------------------------------------------------------
  UPDATE_IN_PROGRESS         AWS::CloudFormation::Sta   sam-app                    User Initiated
                            ck
  UPDATE_IN_PROGRESS         AWS::CloudFormation::Sta   sam-app                    Transformation succeeded
                            ck
  CREATE_IN_PROGRESS         AWS::CloudFormation::Sta   AwsSamAutoDependencyLaye   -
                            ck                         rNestedStack
  CREATE_IN_PROGRESS         AWS::CloudFormation::Sta   AwsSamAutoDependencyLaye   Resource creation
                            ck                         rNestedStack               Initiated
  CREATE_COMPLETE            AWS::CloudFormation::Sta   AwsSamAutoDependencyLaye   -
                            ck                         rNestedStack
  UPDATE_IN_PROGRESS         AWS::Lambda::Function      helloFromLambdaFunction    -
  UPDATE_COMPLETE            AWS::Lambda::Function      helloFromLambdaFunction    -
  UPDATE_COMPLETE_CLEANUP_   AWS::CloudFormation::Sta   sam-app                    -
  IN_PROGRESS                ck
  UPDATE_COMPLETE            AWS::CloudFormation::Sta   sam-app                    -
                            ck
  ---------------------------------------------------------------------------------------------------------


  Stack update succeeded. Sync infra completed.

  Infra sync completed.
The console still listens for changes and if we change our lambda code and save it:
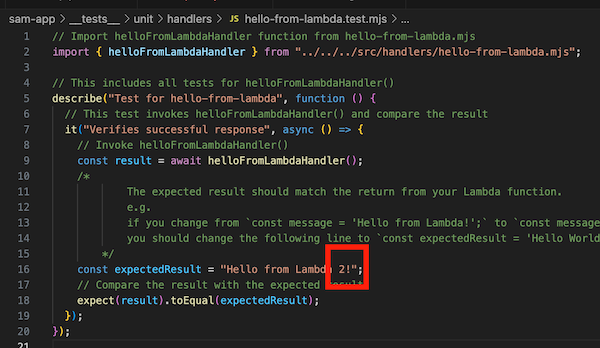
The console will be updated automatically as follows:
1
2
3
4
5
6
7
8
9
10
11
Syncing Lambda Function helloFromLambdaFunction...
Manifest is not changed for (helloFromLambdaFunction), running incremental build
Building codeuri: /Users/alazaroc/Documents/MyProjects/github/aws/sam/sam-app runtime: nodejs20.x
metadata: {} architecture: x86_64 functions: helloFromLambdaFunction
 Running NodejsNpmBuilder:NpmPack
 Running NodejsNpmBuilder:CopyNpmrcAndLockfile
 Running NodejsNpmBuilder:CopySource
 Running NodejsNpmBuilder:CleanUpNpmrc
 Running NodejsNpmBuilder:LockfileCleanUp
 Running NodejsNpmBuilder:LockfileCleanUp
Finished syncing Lambda Function helloFromLambdaFunction.
When you stop it (control + C) in the console it will appear:
1
2
^CShutting down sync watch...
Sync watch stopped.
When you executed the sync command, a nested stack associated with your main stack (sam-app) was created:
And when the console stops being synchronized, this nested stack is NOT deleted.

How to remove the nested stack created with the sync command?
You have to run the sam deploy command again and it will be removed:
1
sam deploy
Click to view command output
        Managed S3 bucket: aws-sam-cli-managed-default-samclisourcebucket-k2z3x0eqvuxq
        A different default S3 bucket can be set in samconfig.toml
        Or by specifying --s3-bucket explicitly.
    File with same data already exists at sam-app/c20f3d4923fb213486783dd25f269a52, skipping upload

      Deploying with following values
      ===============================
      Stack name                   : sam-app
      Region                       : eu-west-1
      Confirm changeset            : True
      Disable rollback             : False
      Deployment s3 bucket         : aws-sam-cli-managed-default-samclisourcebucket-k2z3x0eqvuxq
      Capabilities                 : ["CAPABILITY_IAM"]
      Parameter overrides          : {}
      Signing Profiles             : {}

    Initiating deployment
    =====================

    File with same data already exists at sam-app/3752a1ab023524618cd64cc55081484c.template, skipping upload


    Waiting for changeset to be created..

    CloudFormation stack changeset
    ---------------------------------------------------------------------------------------------------------
    Operation                  LogicalResourceId          ResourceType               Replacement
    ---------------------------------------------------------------------------------------------------------
    * Modify                   helloFromLambdaFunction    AWS::Lambda::Function      False
    - Delete                   AwsSamAutoDependencyLaye   AWS::CloudFormation::Sta   N/A
                              rNestedStack               ck
    ---------------------------------------------------------------------------------------------------------


    Changeset created successfully. arn:aws:cloudformation:eu-west-1:000000000000:changeSet/samcli-deploy1705963790/6b5464b9-0b8e-44c2-93c0-8e0f509c9110


    Previewing CloudFormation changeset before deployment
    ======================================================
    Deploy this changeset? [y/N]: y

    2024-01-22 23:50:02 - Waiting for stack create/update to complete

    CloudFormation events from stack operations (refresh every 5.0 seconds)
    ---------------------------------------------------------------------------------------------------------
    ResourceStatus             ResourceType               LogicalResourceId          ResourceStatusReason
    ---------------------------------------------------------------------------------------------------------
    UPDATE_IN_PROGRESS         AWS::CloudFormation::Sta   sam-app                    User Initiated
                              ck
    UPDATE_IN_PROGRESS         AWS::Lambda::Function      helloFromLambdaFunction    -
    UPDATE_COMPLETE            AWS::Lambda::Function      helloFromLambdaFunction    -
    UPDATE_COMPLETE_CLEANUP_   AWS::CloudFormation::Sta   sam-app                    -
    IN_PROGRESS                ck
    DELETE_IN_PROGRESS         AWS::CloudFormation::Sta   AwsSamAutoDependencyLaye   -
                              ck                         rNestedStack
    DELETE_COMPLETE            AWS::CloudFormation::Sta   AwsSamAutoDependencyLaye   -
                              ck                         rNestedStack
    UPDATE_COMPLETE            AWS::CloudFormation::Sta   sam-app                    -
                              ck
    ---------------------------------------------------------------------------------------------------------


    Successfully created/updated stack - sam-app in eu-west-1
3.7. Step 7: Clean up
If you are followed this tutorial you will only have one stack in our AWS Account, so you can run the sam delete command (which deletes the main stack: sam-app).
1
sam delete
Click to view command output
    Are you sure you want to delete the stack sam-app in the region eu-west-1 ? [y/N]: y
    Are you sure you want to delete the folder sam-app in S3 which contains the artifacts? [y/N]: y
          - Deleting S3 object with key sam-app/c20f3d4923fb213486783dd25f269a52
          - Deleting S3 object with key sam-app/3752a1ab023524618cd64cc55081484c.template
    - Deleting Cloudformation stack sam-app

  Deleted successfully
4. Next steps
Further reading:
- Next SAM post: How to add CI/CD to my SAM project
- SAM + CDK: Interested in how AWS SAM and AWS CDK can work together? I’ve explored this in another article: How to create serverless applications with CDK and SAM. It’s a great next step for those looking to expand their serverless architecture knowledge.
- CDK: How to create Serverless applications with CDK
- Terraform: How to create Serverless applications with Terraform
I look forward to hearing your thoughts and experiences with AWS SAM. Feel free to share them in the comments below. Happy coding!