How I Decided on the Technology Behind the Blog
Before creating my blog and starting posting I did a lot of research comparing technologies, creating proofs of concept, and it took me weeks to figure out how to do it until I felt comfortable with the solution. Want to know more?
Last updated: I have migrated my website from AWS Amplify Hosting to Terraform + S3 + CloudFront + AWS Certificate Manager + Developer Tools.
1. Introduction
My technology approach is as follows:
- Use AWS resources when possible.
- One of the reasons for creating this blog is to practice with AWS.
- As a first step, the blog itself must use AWS resources.
- However, as a good rule, there is an exception
GitHub is used as code repository because I want to share my code easily in a public way.
- Serverless architecture
- I applied the separation of concerns design principle to the frontend and backend.
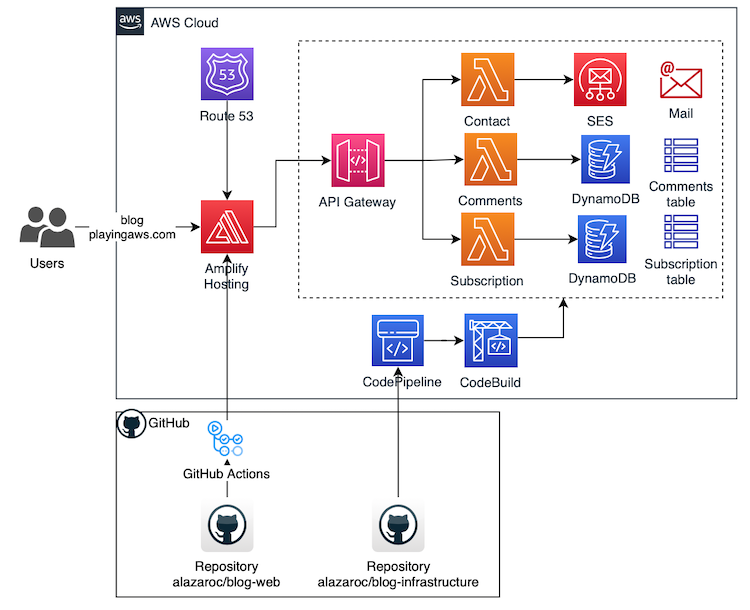
- This is the architecture of my blog:
- Previous Version [1]:
- Current Version [2]:
- Previous Version [1]:

2. Frontend
2.1. Technology to create the blog
First of all, I needed to choose how to create the blog, and nowadays there are a lot of options to do it in a serverless way:
Single Page Application (SPA): React, Angular, Vue.js, Ionic, EmberServer-Side Rendering (SSR): Express.js, Next.js, Nux.js, Gatsby.jsStatic Site Generator (SSG): Gatsby, Next.js, Nuxt.js, Hugo, Jekyll, HexoProgressive Web Apps (PWA): React, Angular, Vue.js, Preact, PWABuilder
Since I wanted to keep it simple, I used a static site generator. I hesitated between Hugo, Jekyll, and Hexo. Although I liked Hugo for its fast build times and execution performance, I finally decided on Jekyll just because I preferred the theme I used (Chirpy). I liked it more visually than the other options and I didn’t want to have to customize it too much.
I am a big fan of the KISS (Keep It Simple, Stupid) design principle!
2.2. Technology to deploy the blog
After choosing Jekyll as my static site generator, I needed to decide how to deploy it on AWS. There are many options to do it:
EC2 + RDS(i.e. traditional blog with WordPress / Ghost + Gatsby / …)LightSail(by the way, an interesting article comparing LightSail with EC2)Container solutions(ECS/EKS)AWS ElasticBeanstalkS3AWS Amplify
2.2.1. Version 1
But since I wanted it serverless and simple, in v1 (until March 5, 2023) I used AWS Amplify to help me with this point.
What is AWS Amplify? (Explained by AWS)
AWS Amplify is a set of purpose-built tools and features that enables frontend web and mobile developers to quickly and easily build full-stack applications on AWS.
Amplify provides two services: Amplify Hosting and Amplify Studio.
- Amplify Hosting provides a git-based workflow for hosting full-stack serverless web apps with continuous deployment.
- Amplify Studio is a visual development environment that simplifies the creation of scalable, full-stack web and mobile apps. Use Studio to build your frontend UI with a set of ready-to-use UI components, create an app backend, and then connect the two together.
AWS Amplify is a fast and easy way to develop and deploy reliable and scalable mobile and web applications on AWS.
I used Amplify Hosting for the following reasons (there are more, but the following are important to me):
- Serverless (uses S3 and CloudFront behind the scenes)
- Integrates with my existing code in GitHub
- Supports Jekyll (my static site generator)
- Manage the CI/CD of my application
- Easy way to connect my application with my custom domain
- Instant cache invalidations in new versions
- Integrated with Amazon CloudWatch
As you can see, this solution is awesome if you want AWS to manage for you the CI/CD, web, cache, the certificate of your domain…
2.2.2. Version 2 [Current version]
Version 1, using Amplify Hosting, was too “automagic” for me and I am here to practice/play and show you the results… so I migrated my website to a custom solution to have more control and access to a wider range of services, which adds more fun!
I created the infrastructure using Terraform with the following AWS services:
S3 bucketused as websiteCloudFront Distributionin front of the S3 bucketLambda@Edgeto use it in CloudFront, to transform all requests (required for Jekyll web)AWS ACM: Certificate generation of my custom domain (playingaws.com)Developer Tools(Amazon CodeBuild and Amazon CodePipeline): to deploy the Infrastructure as Code with Terraform
2.3. How to deploy it
2.3.1. Version 1
I wrote how I did it in this post: How to deploy a website with AWS Amplify Hosting.
And I complemented it with this one: How to add CI/CD to my CDK project.
2.3.2. Version 2 [Current version]
The Infrastructure as Code (IaC) was created with Terraform and used the Developer Tools (Amazon CodeBuild and Amazon CodePipeline) to deploy and automate the IaC.
3. Backend
3.1. What resources should I create
No backend is necessary for a blog. Simple blogs that only have content don’t need anything more than static pages. However, if you want more functionality like forms, email subscriptions, or comments you will need to use external plugins (to store the data somewhere else, not on AWS) or create your solutions.
I don’t want to use external plugins if I can do the same by myself in AWS and practice/play with new services in the process.
After creating my empty blog I thought that it would be a good idea to implement the following:
- Contact forms
- Email Subscription (to receive blog updates)
- Add comments to each post (register it and show it)
Now, I have a basic implementation of these points but I will improve it in the future.
The backend could be integrated with the frontend with
Amplify Studio, but I am not interested in doing it that way. I want separation of concerns and manage both independently.
3.1.1. Forms
- External option easy to integrate:
Google Forms. Custom AWS solution:
  flowchart LR
  A(Contact form) --> B(Amazon API Gateway)
  B --> C(AWS Lambda)
  C --> D(Amazon SES)
  D --> E(My email)
3.1.2. Email Subscription
- Used here: Mail subscription
- External option easy to integrate:
Mailchimp Custom AWS solution:
  flowchart LR
  A(Email subscription form) --> B(Amazon API Gateway)
  B --> C(AWS Lambda)
  C --> D(Amazon DynamoDB)
At this moment, I only store the subscription information and if I want to send emails I have to do it manually. However, in the future, I will automate it, and I will add the option to unsubscribe in the email sent.
3.1.3. Comments (updated January 27, 2023)
- It is used at the end of each post
In the first year of my blog, the solution was as follows:
flowchart LR A(Email subscription form) --> B(Amazon API Gateway) B --> C(AWS Lambda) C --> D(Amazon DynamoDB)- This solution was a custom AWS solution to use more AWS services and although I received some comments and stored them in the database, I didn’t implement the system to display them on the blog.
However, now I am using the
giscusplugin:flowchart LR A(Email subscription form) --> B(GitHub repository) B --> C(GitHub discussion)
3.2. Technology to deploy infrastructure
Now, I am using CDK (Cloud Development Kit) and Terraform.
3.2.1. Version 1
Initially, in version 1, I used:
AWS CDK with TypeScriptprogramming language to deploybackend infrastructureusing this GitHub repository: https://github.com/alazaroc/blog-legacy-backend-infrastructure.AWS Amplify Hostingto create for me thefrontend infrastructureto deploy the Jekyll web located in this GitHub repository: https://github.com/alazaroc/blog-web-code.
Honestly, I did not evaluate other options, since I knew which one to choose and I wanted to be as simple as possible.
What is CDK? (Explained by AWS)
CDK is an open-source software development framework to define your cloud application resources using familiar programming languages.
AWS CDK provisions your resources in a safe, repeatable manner through AWS CloudFormation, but also is available (in alpha phase) a CDK for Terraform cdktf and a CDK for Kubernetes cdk8s. To find all of these CDKs in one place, check out Construct Hub, a place to discover and share construct libraries published by the open-source community, AWS, and partners.
To me, with a developer background, AWS CloudFormation is complex and AWS CDK fills the gap because it allows me to use a programming language to create the infrastructure easily, it is wonderful.
3.2.2. Version 2 [Current version]
However, I have now migrated the frontend infrastructure to Terraform. The backend infrastructure continues to be CDK with TypeScript.
3.3. How to deploy infrastructure
I have written the following articles to explain it:
4. Price estimation of the blog
When I created my blog, with the free tier the cost was 0 euros per month, except the payment of the domain.
Price information by services used:
| AWS resource | Action | Free Tier (per month) | Estimation price |
|---|---|---|---|
| Amazon Route53 | Domain Registration | $1 for domain | $1 |
| Amazon Route53 | Hosted Zone | $0.50 per Hosted Zone for the first 25 | $0.50 |
| AWS Amplify | Build & Deploy | $0 for 1000 build minutes | $0 |
| AWS Amplify | Hosting | 5 GB stored | $0 |
| AWS Amplify | Hosting | $0 for 15 GB served | $0 |
| API Gateway | API calls for REST API | $0 for 1 million | $0 |
| Amazon DynamoDB On-demand | Data Storage on Standard table | $0 for 25 GB | $0 |
| Amazon DynamoDB On-demand | Data transfer out to the internet | $0 for 100 GB | $0 |
| AWS Lambda | Requests per month | $0 for 1 million | $0 |
| AWS Lambda | Compute time | $0 for 400,000 GB-seconds | $0 |
| AWS CDK & AWS CloudFormation | Free to use | $0 |
TOTAL 1.5$ per month. Taxes are NOT included.
The domain name purchase on Route53 is annual and is paid in the month of purchase, but for simplicity, I have split it into each month. Also, the invoice category is NOT Route53 but “Registrar”, “Global Region”, and “Amazon Registrar DomainRegistration”.
Use Amazon Route53 for Register Domain is not the cheapest option. I paid $12 instead of around $1 for the first year with GoDaddy, but it is worth it.
5. Next steps
I have many next steps identified, but I will put here the ones related to the content of this post.
- Update comments form –> March 17, 2022 –> A form was available and comments were recorded in a database
- Show comments in the posts –> January 27, 2023 –>
giscusplugin has been integrated into my web - Migrate AWS Amplify Hosting to S3 + CloudFront + AWS Certificate Manager + Developer Tools –> March 5, 2023
- Automate email subscription